
Urgent: Rescue Protocols for Clients Falling Through Thin Lake Ice?
For over two decades navigating the pristine, yet often treacherous, frozen landscapes of the world for winter sports, I’ve witnessed the fine line between exhilarating adventure and critical emergency. It’s a reality that, despite our best efforts, the unpredictable nature of ice can sometimes lead to a guide’s worst nightmare: a client falling through.
The problem is stark: when a client plunges into frigid water, time is not just a factor; it’s a merciless countdown. Panic sets in, hypothermia threatens, and every second counts. Without clear, practiced rescue protocols for clients falling through thin lake ice, even the most experienced guides can find themselves overwhelmed, jeopardizing not only the client’s life but also the safety of the entire group and the guide themselves.
In this definitive guide, I’ll share the critical frameworks, actionable steps, and expert insights drawn from years of field experience and incident analysis. You’ll learn not just what to do, but why, focusing on immediate response, advanced rescue techniques, comprehensive post-rescue care, and robust prevention strategies to ensure you’re truly prepared for the unthinkable.
Understanding the Unseen Threat: Thin Ice Dynamics
Before we delve into rescue, it’s crucial to understand the adversary: thin ice. It’s rarely uniformly thick, and its strength can be deceptive. A seemingly solid surface can hide pockets of weakness, often due to underwater currents, thermal springs, or varying snow cover that insulates the ice differently. In my experience, assuming consistency is the first step towards an incident.
“The most dangerous ice is not the obviously thin, but the deceptively stable. Always assume variability and test, test, test.”
Several factors contribute to ice instability, making a comprehensive understanding vital for any guide operating on frozen lakes:
- Temperature Fluctuations: Repeated freezing and thawing cycles weaken ice structure significantly, creating a honeycomb effect.
- Snow Cover: While snow can insulate, heavy snow can also prevent ice from thickening by insulating it from cold air, and its weight can cause stress fractures.
- Currents and Inflows: Rivers or streams feeding into a lake can create powerful currents beneath the ice, thinning it from below.
- Sun Exposure: Dark objects on ice (like rocks or logs) absorb solar radiation, creating localized weak spots.
- Springs and Vents: Underwater springs release warmer water, creating dangerously thin areas that are often invisible from the surface.
Understanding these dynamics isn’t just academic; it’s the foundation of effective prevention and, by extension, effective rescue. Knowing where weaknesses are likely to occur allows for proactive route planning and constant vigilance.

Immediate Action: The Critical First 60 Seconds
When a client falls through, the immediate aftermath is chaotic. The client is in shock, the cold is intense, and panic can quickly incapacitate. As a guide, your role is to immediately take control, manage the scene, and initiate the rescue. The first 60 seconds are about containment and initiating the primary rescue technique.
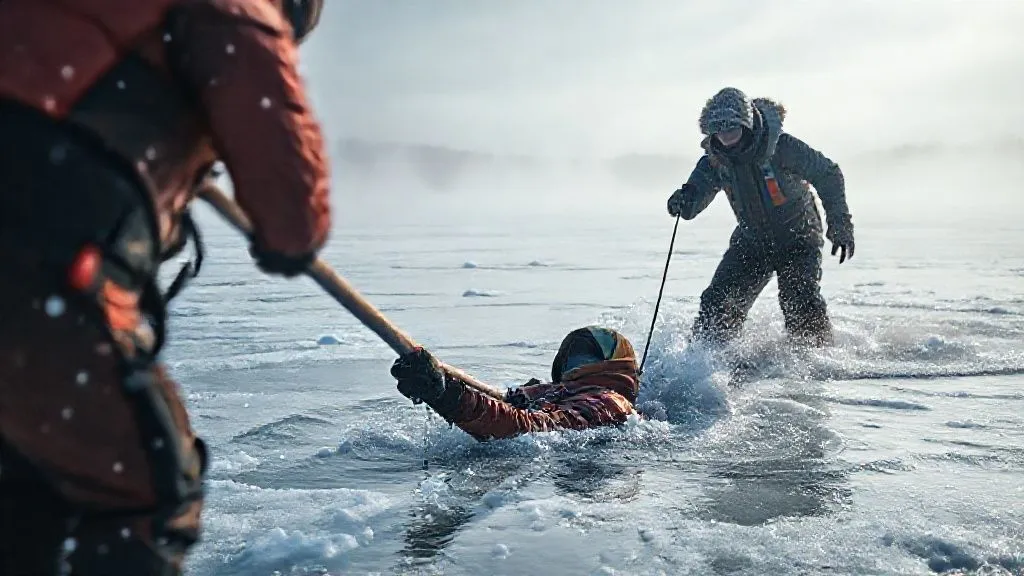
The “Reach, Throw, Go” Principle
This fundamental principle guides initial ice rescue attempts, prioritizing the rescuer’s safety above all else. Remember, a secondary victim only compounds the problem.
- Reach: If the client is close enough and you can safely extend a hand, pole, or branch from a stable position on solid ice, do so. Lie flat on the ice to distribute your weight. This is the safest and quickest method if feasible.
- Throw: If reaching isn’t possible, throw a rope, a rescue bag, or anything that floats and can be grasped (e.g., a spare jacket tied to a rope). Again, lie flat and ensure you have a secure anchor or another person to brace you. Communicate calmly and clearly to the client to grab the object.
- Go: This is the last resort and only for trained rescuers with appropriate equipment (ice picks, flotation suit, safety line). Never “go” onto thin ice without proper training and gear, as it significantly increases the risk of a double incident. If “go” is necessary, crawl or “swim” to the victim, using ice picks for propulsion and leverage.
Case Study: The Swift Response at Lake Serenity
Last winter, during a guided snowshoe trek across Lake Serenity, a client, Sarah, veered slightly off the marked path and plunged through a newly formed weak spot near the shore. The immediate sound of cracking ice and Sarah’s gasp galvanized the lead guide, Mark. He instantly dropped to his stomach, shouted instructions to the rest of the group to stay put, and began to slide a pre-rigged rescue pole towards Sarah while maintaining a safe distance. Sarah, initially panicked, responded to Mark’s calm, clear commands. She grasped the pole, and with the assistance of a second guide bracing Mark, she was slowly and carefully pulled to thicker ice. This swift, textbook application of the “Reach” principle, combined with immediate group control, minimized her time in the water to less than 45 seconds, significantly reducing the onset of severe hypothermia.
This incident underscores the importance of not just knowing the protocols, but having them ingrained through practice and having the right equipment immediately accessible. Every second counts, and a pre-planned, practiced response can make all the difference.
| Action Phase | Key Steps | Primary Goal | Equipment Needed |
|---|---|---|---|
| Immediate Response (0-60s) | Assess scene, secure rescuer, communicate, initiate Reach/Throw | Extract client from water | Rescue pole/rope, ice picks, whistle, communication device |
| Stabilization (1-5 min) | Move to safe ice, remove wet clothing, provide insulation | Prevent further heat loss, manage shock | Dry clothes, space blanket, warm liquids, emergency shelter |
| Evacuation (5+ min) | Monitor vitals, transport to warmth/medical aid | Professional medical assessment/care | Stretcher, sled, first-aid kit, communication device |
Advanced Rescue Techniques: Beyond the Basics
While “Reach, Throw, Go” covers the initial response, not all situations allow for such simplicity. Sometimes, the client is further out, or the ice is too unstable for a simple reach. This is where advanced techniques and specialized equipment become indispensable. As a veteran in this field, I cannot stress enough the importance of regular, hands-on training for these scenarios.
Team-Based Rescue Strategies
When a single rescuer isn't enough, a coordinated team effort is vital. This often involves creating a wider weight distribution and using specialized tools. According to the NFPA 1670 Standard on Operations and Training for Technical Search and Rescue Incidents, a systematic approach is paramount for scene safety and victim extraction.
- Human Chain: Multiple rescuers lie flat on the ice, forming a chain to distribute weight and extend reach. The person closest to the edge should be secured by those further back.
- Ladder/Board Slide: Using a ladder, plank, or even a sturdy ski as a makeshift bridge to distribute weight and provide a stable platform for the rescuer to approach the victim.
- Rope Systems: More complex rescues might involve setting up rope systems with anchors further back on solid ground or thicker ice, allowing a rescuer to be lowered or pulled back. This requires specific training in knots and rigging.
- Specialized Ice Rescue Sleds/Boards: These devices are designed to distribute weight, float, and provide a stable platform for both rescuer and victim. They are invaluable for extracting an unresponsive or injured client.
Key equipment for advanced scenarios includes:
- Ice Picks: Essential for self-rescue and rescuer mobility on ice.
- Throw Bags: Ropes neatly packed in a bag, easy to deploy.
- Flotation Suits/Dry Suits: For rescuers who may enter the water.
- Ladders/Rescue Boards: For weight distribution and extended reach.
- Carabiners and Webbing: For setting up anchors and rope systems.
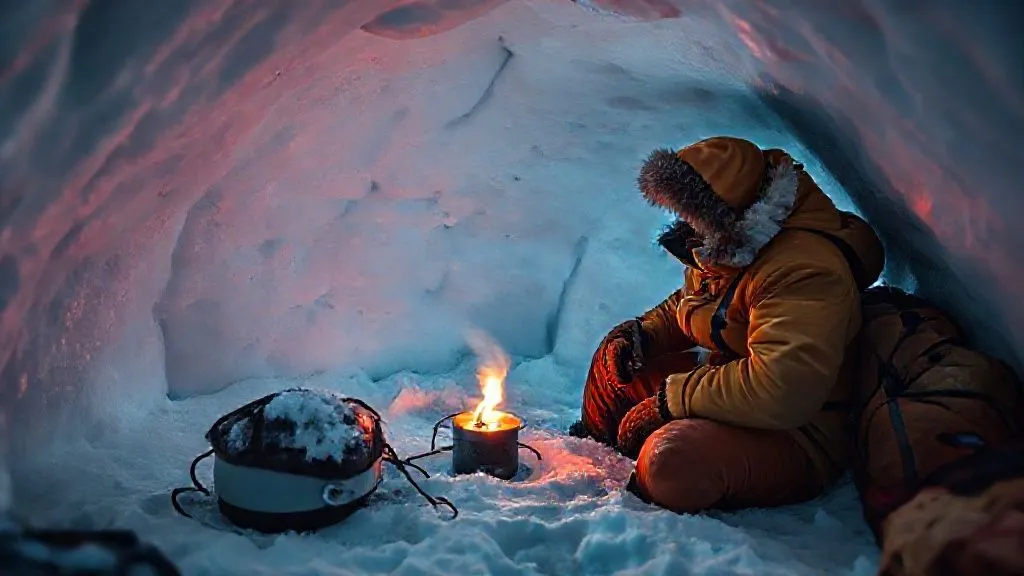
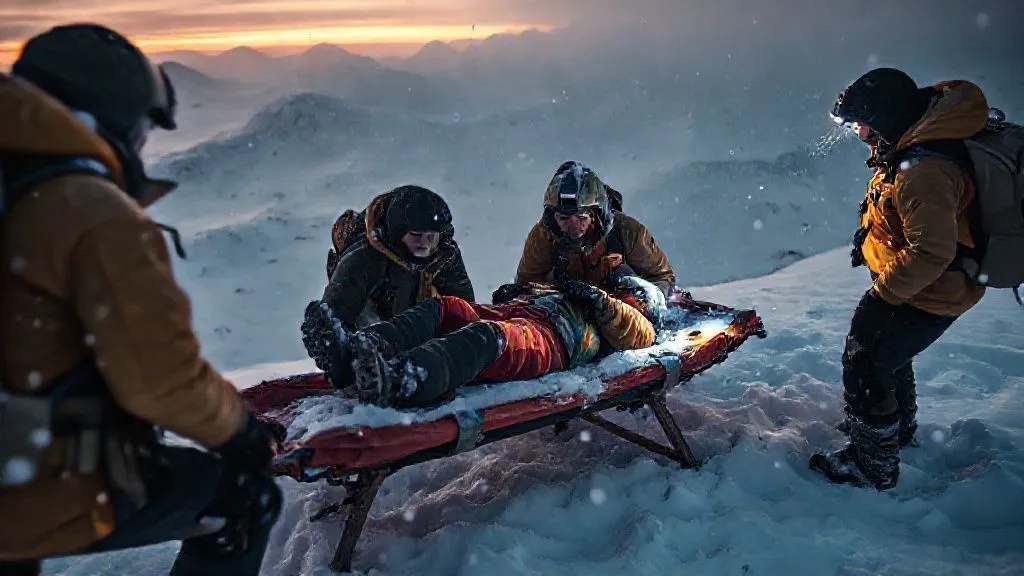
Post-Rescue Care: Battling Hypothermia and Shock
Extracting a client from the water is only the first step. The true battle begins immediately afterward: combating the rapid onset of hypothermia and managing psychological shock. As outdoor educator Paul Petzoldt famously stated, “There is no bad weather, only inappropriate clothing.” In this context, there’s no bad rescue, only inadequate post-rescue care.
Recognizing Hypothermia Stages
Hypothermia is a medical emergency where the body loses heat faster than it can produce it, leading to a dangerously low body temperature. Recognizing its stages is critical for effective treatment:
- Mild Hypothermia (90-95°F / 32-35°C): Shivering, confusion, slurred speech, clumsy movements, pale skin. The victim is usually still conscious and able to help themselves.
- Moderate Hypothermia (82-90°F / 28-32°C): Shivering stops, increased confusion, irrational behavior, poor coordination, slow pulse, shallow breathing. The victim may appear lethargic or unresponsive.
- Severe Hypothermia (<82°F / <28°C): Unconsciousness, no discernible breathing or pulse (often mistaken for death), rigid muscles, dilated pupils. This is a life-threatening emergency requiring immediate professional medical attention.
The moment the client is on stable ice, the priority shifts to rapidly stopping heat loss and initiating rewarming. This includes immediately removing all wet clothing—even if it means cutting it off—and replacing it with dry, warm layers. According to the Mayo Clinic, slow and gradual rewarming is key to avoiding further complications.
| Hypothermia Stage | Core Temp (°F) | Symptoms | First Aid Response |
|---|---|---|---|
| Mild | 90-95 | Shivering, confusion, slurred speech | Remove wet clothes, dry, warm layers, warm sweet drinks, gentle movement |
| Moderate | 82-90 | Shivering stops, lethargy, irrationality, slow pulse | Handle gently, insulate, warm packs to core, no alcohol/caffeine, prepare for evacuation |
| Severe | <82 | Unconscious, no pulse/breathing, rigid | CPR if needed, insulate fully, immediate professional medical evacuation, no rewarming attempts in field |
Prevention is Paramount: Proactive Ice Safety Protocols
While knowing how to rescue is vital, preventing an incident from occurring in the first place is the hallmark of a truly experienced and responsible guide. My philosophy has always been: the best rescue is the one that never has to happen. This requires rigorous planning, constant vigilance, and clear communication with clients.
Assessing Ice Thickness & Conditions
Never assume ice is safe. Always verify. This involves a multi-layered approach to assessment:
- Pre-Trip Research: Consult local authorities, ice reports, and experienced locals. Understand the history of the lake and typical ice patterns.
- Visual Inspection: Look for color variations (clear/blue ice is strongest, white/opaque ice is weaker, gray/dark ice is weakest), cracks, slushy areas, or open water.
- Sound Test: Safe ice “booms” or “cracks” loudly when struck; thin ice “thuds” or “splashes.”
- Physical Testing: Use an ice chisel or auger to regularly test thickness along your route. Rule of thumb:
- 2 inches (5 cm): STAY OFF!
- 4 inches (10 cm): Safe for ice fishing or walking alone.
- 5-7 inches (12-18 cm): Safe for snowmobiles or small ATVs.
- 8-12 inches (20-30 cm): Safe for cars or small trucks.
- 12-15 inches (30-38 cm): Safe for medium trucks.
- Probe Pole: Use a long pole to probe ahead of you, especially in areas of uncertain ice.
Educate your clients about these signs and the importance of following your exact path. As a guide, you are the ultimate authority on ice safety for your group. For detailed regional ice safety guidelines, refer to resources like Minnesota DNR Ice Safety, which provides excellent public education materials.
Training & Preparedness: Equipping Your Team
A guide’s expertise isn’t innate; it’s cultivated through continuous training and meticulous preparation. This isn't just about individual skill; it’s about fostering a culture of safety within your team and among your clients. As I’ve often told aspiring guides, “Hope is not a strategy; preparedness is.”
Essential Gear for Guides and Clients
Beyond the rescue-specific items, personal gear plays a crucial role in prevention and survival:
- Ice Picks (for clients too!): Small, handheld picks that can be dug into the ice to pull oneself out. These are non-negotiable for anyone venturing onto ice.
- Whistle: For signaling for help.
- Headlamp/Flashlight: Crucial for visibility, especially in low light or whiteout conditions.
- Navigation Tools: GPS, map, and compass (and the knowledge to use them) to stay on safe routes.
- Communication Device: Satellite phone, two-way radio, or fully charged cell phone in a waterproof case.
- Emergency Kit: Contains fire starter, extra food, water, first-aid supplies, and a space blanket.
- Dry Bag with Spare Clothes: Essential for immediate post-immersion rewarming.
- Layered Clothing: Non-cotton layers that wick moisture and insulate, even when damp.
Regular training drills are paramount. These should include simulated ice falls, practicing the “Reach, Throw, Go” sequence, and full-scale team rescues. Participating in certified ice rescue courses, such as those offered by the Rescue Specialties or other accredited organizations, ensures that your skills are current and meet industry standards. This not only builds competence but also confidence, which is invaluable in an emergency.
Legal & Ethical Responsibilities for Guides
Operating as a professional guide carries significant legal and ethical responsibilities, particularly concerning client safety. When an incident like an ice fall occurs, your actions—or inactions—will be scrutinized. My advice is always to operate with the highest standard of care, ensuring you’re not only prepared for emergencies but also compliant with all relevant regulations.
Documentation and Incident Reporting
In the unfortunate event of an incident, thorough and accurate documentation is critical for several reasons:
- Legal Protection: Provides a factual account of events, actions taken, and conditions, which can be vital in liability cases.
- Operational Improvement: Helps identify weaknesses in protocols, equipment, or training, leading to better safety practices in the future.
- Insurance Claims: Required by insurance providers for processing claims related to injuries or equipment damage.
- Regulatory Compliance: Certain incidents may require reporting to local authorities or industry bodies.
Key elements to document include:
- Date, time, and exact location of the incident.
- Names of all individuals involved (client, guides, witnesses).
- Detailed description of the event, including ice conditions, weather, and contributing factors.
- Actions taken by the guide(s) and client(s) before, during, and after the rescue.
- Equipment used and its condition.
- Client’s condition immediately after rescue and during transport.
- Any first aid or medical attention provided.
- Communication with emergency services.
- Photographs or videos of the scene (if safe and appropriate).
Consult with legal counsel and your insurance provider to understand specific requirements for incident reporting within your jurisdiction and industry. Proactive risk management, including comprehensive waivers and clear communication of inherent risks to clients, forms another layer of protection and ethical practice.
Frequently Asked Questions (FAQ)
Question? What’s the absolute minimum ice thickness for guiding a small group of experienced ice skaters?
Answer: For guiding a small group (e.g., 2-3 people) of experienced ice skaters, I would personally not venture onto ice less than 6 inches (15 cm) of clear, blue ice. While 4 inches is often cited for walking, the dynamic stresses of skating, especially with a group, demand a greater safety margin. Always use a probe and test regularly, and ensure your clients understand the risks and your safety protocols. Remember, this is a minimum and should be increased based on ice quality, currents, and client experience.
Question? How do I manage a client’s panic effectively during an ice fall?
Answer: Managing panic is crucial. Your calm, authoritative voice is your most powerful tool. Immediately establish verbal contact, using short, clear, actionable commands: “Look at me!” “Grab the rope!” “Kick your legs!” Avoid yelling or showing your own fear. Reassure them you’re there and have a plan. Sometimes, a quick, firm instruction to focus on breathing can help them regain a sliver of control. Practice these commands during drills so they become second nature.
Question? Is it ever safe for a guide to enter the water without a dry suit for a rescue?
Answer: In almost all professional guiding scenarios, no. Entering frigid water without proper thermal protection (a dry suit or immersion suit) immediately puts the rescuer at extreme risk of cold shock, incapacitation, and rapid hypothermia. This creates a double-victim scenario, which is the worst possible outcome. The “Go” part of “Reach, Throw, Go” should only be attempted by a trained rescuer wearing appropriate personal protective equipment (PPE), including a flotation suit and tethered to a safety line. Prioritize your safety to ensure you can effectively save your client.
Question? What’s the best way to rewarm a severely hypothermic client in the field?
Answer: For severe hypothermia, field rewarming is extremely delicate and limited. The primary goal is to prevent further heat loss and arrange immediate professional medical evacuation. Remove wet clothing, insulate the client completely (sleeping bag, space blankets, emergency shelter), and handle them extremely gently to avoid “afterdrop” or cardiac arrest. Do NOT rub the skin, give alcohol, or apply direct intense heat. Warm, sweet drinks can be given if conscious. The definitive treatment for severe hypothermia is in a hospital setting. Your role is to stabilize and transport.
Key Takeaways and Final Thoughts
The responsibility of a winter sports guide operating on frozen lakes is immense. The unforgiving nature of thin ice demands not just respect, but comprehensive preparedness. My years in this niche have taught me that while incidents can never be entirely eliminated, their impact can be drastically mitigated through knowledge, training, and unwavering diligence.
- Prevention is paramount: Master ice assessment, plan meticulously, and educate clients thoroughly.
- Act immediately: The first minute post-immersion is critical for successful extraction and survival.
- Prioritize rescuer safety: A second victim only complicates an already dire situation.
- Train relentlessly: Regular drills and certified courses build essential skills and confidence.
- Prepare for post-rescue: Effective hypothermia management is as vital as the rescue itself.
- Document everything: For legal, ethical, and operational improvement reasons.
Ultimately, being prepared for urgent rescue protocols for clients falling through thin lake ice isn’t just about having a checklist; it’s about cultivating a mindset of proactive safety and courageous competence. Equip yourself, train your team, and instill confidence in your clients. Go forth, explore, and lead safely, knowing you’re ready for whatever the frozen wilderness may present.
Recommended Reading
- 7 Proven Strategies: How to Stop Overtourism Harming National Park Ecosystems
- 7 Steps to Safely Transport Your Racing Wheelchair on International Flights
- Burnout to Breakthrough: 7 Spiritual Paths for Executive Renewal
- 7 Sustainable Strategies: Marketing Niche Cultural Festivals Globally
- How to Prevent Igloo Melting: 5 Essential Tips for Warmer Spells


Your email address will not be published. Required fields are marked *