
How to Fix Snowshoe Binding Failures During Remote Winter Expeditions?
For over two decades exploring the world's most remote winter landscapes, I've seen firsthand how quickly a dream expedition can turn into a desperate struggle. It's often not the blizzards or the avalanches that catch seasoned adventurers off guard, but the seemingly minor gear failures – especially a broken snowshoe binding. I still recall a harrowing trip deep in the Canadian Rockies where a pivot point snapped miles from civilization, forcing a slow, arduous crawl back, realizing then the profound importance of preparedness.
The stark reality of remote winter expeditions is that every piece of gear is a lifeline. A compromised snowshoe binding isn't just an inconvenience; it can lead to frostbite, exhaustion, injury, or even a life-threatening situation. The pain point is palpable: the fear of being stranded, unable to move efficiently, when rescue is days away or impossible. It's a vulnerability that preys on the minds of even the most experienced winter travelers.
This comprehensive guide isn't just a collection of tips; it's a distillation of years of hard-won experience and field-tested strategies. You'll learn not only the critical steps to diagnose and execute emergency repairs but also the preventative measures and essential gear that will empower you to tackle binding failures with confidence, ensuring your remote winter expeditions remain safe and successful. We'll dive into actionable frameworks, a real-world case study, and expert insights to make you a master of backcountry binding resilience.
Understanding Common Snowshoe Binding Failure Points
Before you can fix a problem, you must understand its root cause. Snowshoe bindings, despite their robust appearance, have several Achilles' heels that are prone to failure under the strenuous conditions of remote winter travel. Identifying these weaknesses is the first step in effective prevention and repair.
Strap and Buckle Degradation
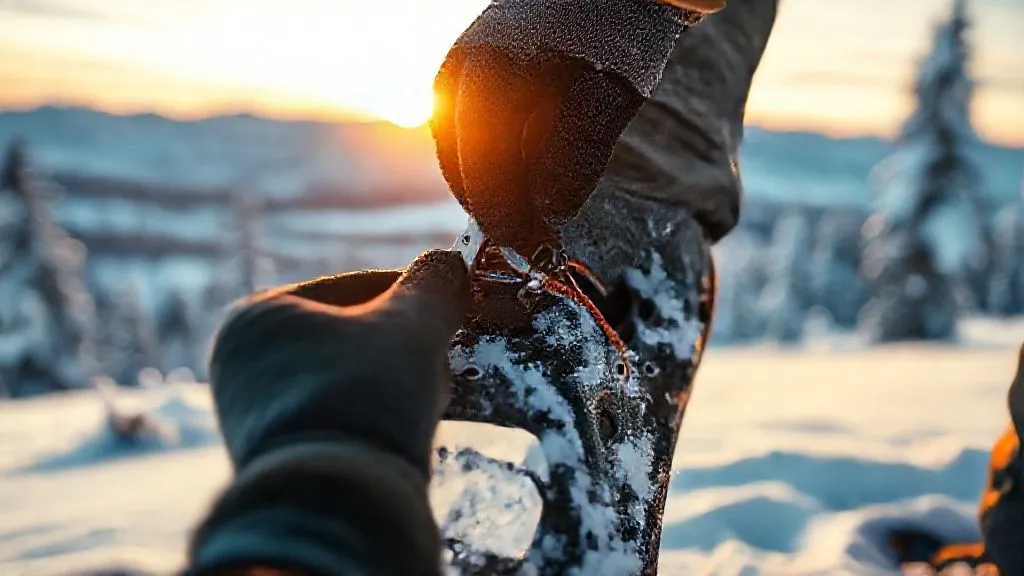
This is perhaps the most frequent culprit. Exposure to extreme cold, UV radiation, repeated flexing, and ice accumulation can make plastic straps brittle and prone to cracking. Buckles, whether made of plastic or metal, can snap under stress, especially when attempting to tighten them with cold, stiff hands or when they take an impact. I've seen countless trips derailed by a simple, broken toe strap.
Pivot Point Wear and Tear
The pivot point, where your boot attaches to the snowshoe decking, is a high-stress area. It bears the brunt of every step, enduring constant friction and torque. Over time, pins can shear, rivets can loosen, and the plastic or metal housing can crack. A compromised pivot dramatically reduces control and efficiency, making travel treacherous.
Decking Attachment Issues
Some bindings directly integrate with the snowshoe's decking. Screws can loosen, rivets can pull through, or the material itself can tear around the attachment points. While less common, this failure can be particularly challenging as it often requires a more structural repair to the snowshoe itself, not just the binding component.
Sub-Zero Material Fatigue
Materials behave differently in extreme cold. Plastics become less flexible and more brittle, metals can become more susceptible to fatigue, and even textiles can lose some integrity. Understanding how your specific gear reacts to sub-zero temperatures is crucial for anticipating potential failure points. Always handle cold gear with care and avoid unnecessary stress.

Pre-Expedition Binding Inspection and Maintenance: Your First Line of Defense
Prevention is always better than a field repair, especially when your safety depends on it. A thorough pre-expedition inspection and proactive maintenance regimen can drastically reduce the likelihood of binding failures. This is where your expertise truly begins to shine.
Visual and Manual Inspection
- Examine All Straps: Look for any signs of cracking, fraying, cuts, or excessive wear. Pay close attention to the areas where straps pass through buckles or attach to the binding frame. Flex them gently to check for brittleness.
- Test Buckles and Ratchets: Operate every buckle and ratchet mechanism. Ensure they engage securely, release smoothly, and show no signs of sticking or weakness. Check for any hairline cracks in plastic components.
- Inspect Pivot Points: Manually manipulate the binding to check for excessive play or stiffness at the pivot. Look for bent pins, loose rivets, or any stress fractures around the pivot housing.
- Check Decking Attachments: If your bindings are integrated, ensure all screws, bolts, or rivets are tight and secure. Look for any tears or stretching in the decking material around these points.
Lubrication and Tightening
For bindings with moving metal parts, a light application of a silicone-based lubricant (ensure it's cold-weather rated) can prevent seizing and reduce wear. For bindings with screws or bolts, ensure they are snug, but avoid overtightening, which can strip threads or crack plastic. I often use a small dab of Loctite on critical screws for added security.
Testing Under Load
Don't just inspect; test. Put on your snowshoes with your expedition boots and pack. Walk around, climb a small incline, and simulate typical expedition movements. This stress test can reveal weaknesses that a static inspection might miss. It's far better to discover a problem in your backyard than miles deep in the backcountry.
Expert Insight: "Treat your snowshoes like your vehicle. You wouldn't embark on a cross-country road trip without checking your tires and oil. Your snowshoes are your winter vehicle; inspect them with the same diligence."
The Essential Snowshoe Repair Kit: What to Carry
A well-stocked, compact repair kit is non-negotiable for remote winter expeditions. It's not about carrying everything, but carrying the *right* things. Based on years of experience, here's what consistently earns its place in my pack:
Core Components for Immediate Repairs
- Heavy-Duty Zip Ties (various sizes): Indispensable for securing broken straps, reattaching buckles, or temporarily holding a pivot point. Opt for cold-weather rated ties if possible.
- Duct Tape (small roll): The ultimate multi-purpose repair tool. Great for reinforcing cracked plastic, patching small decking tears, or even creating a makeshift strap. Wrap a few feet around a trekking pole or water bottle to save space.
- Multi-Tool with Pliers and Knife: Essential for cutting, tightening, prying, and general manipulation.
- Strong Cordage (20-30 feet of 3-4mm utility cord): Paracord or similar. Can be used for lashing, creating new straps, or reinforcing existing ones.
- Small Wire (18-20 gauge): Excellent for more robust temporary repairs, especially for pivot points or reinforcing stressed areas.
Spare Parts and Advanced Items
- Spare Buckles/Straps: If your snowshoes use proprietary buckles, carry one or two spares. Generic cam buckles can often serve as a replacement for many types.
- Small Screws/Nuts/Washers: For bindings that use mechanical fasteners, a few spares in common sizes can be a lifesaver.
- Safety Pins/Needle and Thread: For minor fabric repairs or securing loose straps.
- Small Tube of Cold-Weather Epoxy (optional): For more permanent field repairs, though requires curing time.

Field Repair Techniques: Quick Fixes for Common Issues
When a binding fails miles from help, quick, effective action is paramount. These techniques are designed to get you moving safely again, even if the repair isn't pretty.
Broken Straps & Buckles
This is the most common failure. The goal is to re-secure your boot to the snowshoe platform. Often, a combination of items from your repair kit will be needed.
- Zip Tie Method: If a plastic strap has snapped or a buckle has broken, thread heavy-duty zip ties through the existing attachment points. Use multiple ties for strength and redundancy. Overlap them if possible. Ensure they are tight enough to secure your boot but not so tight as to cut off circulation.
- Cordage Lashing: If zip ties aren't strong enough or you're out, use your utility cord. Lash your boot directly to the snowshoe frame or through existing strap loops. Create a figure-eight pattern or a series of half-hitches to distribute the load and prevent slipping. Practice this at home!
- Duct Tape Reinforcement: For cracked but not fully broken straps, wrap them tightly with duct tape. This buys you time and prevents further degradation until a more robust repair can be made or you reach safety.
Pivot Point Failures
A broken pivot can make a snowshoe unusable. These repairs are often more structural and demand creativity and strong materials.
- Wire & Duct Tape Splint: If a pivot pin has sheared or the housing is cracked, use wire to create a new, temporary pivot. Thread the wire through the existing holes (or carefully create new ones if necessary) and twist it tightly. Reinforce the area with multiple layers of duct tape to provide stability and prevent further movement.
- Cordage Lashing for Control: If the pivot is completely gone, you might need to lash your boot directly to the snowshoe in a way that allows for minimal articulation. This will be less efficient but will allow you to shuffle forward. This often involves lashing the toe of your boot to the snowshoe frame and then securing the heel to prevent excessive lift.
Case Study: How a Broken Buckle Saved a Summit Attempt
On a winter ascent of Mount Robson, my climbing partner, Alex, experienced a catastrophic failure of a heel strap buckle on his snowshoe – a critical point for downhill stability. We were still a significant distance from our high camp. Panic was a real possibility. Instead, drawing on prior training, he calmly retrieved his repair kit. Using two heavy-duty zip ties to bridge the broken buckle and a short length of utility cord wrapped in a figure-eight pattern around his ankle and the snowshoe frame, he created a surprisingly stable temporary fix. This quick, decisive action, taking less than 10 minutes, allowed us to continue our descent safely and efficiently, preventing a potentially dangerous bivy or a slow, arduous post-holing slog. This resulted in a safe return to camp and ultimately, a successful summit two days later, all thanks to preparedness and on-the-spot problem-solving.
Improvised Solutions: When Your Kit Fails or is Absent
Sometimes, despite your best intentions, your repair kit might be incomplete, lost, or simply insufficient for the task at hand. This is where true wilderness ingenuity comes into play. You must think beyond manufactured solutions and utilize what your environment and personal gear offer.
Utilizing Clothing and Personal Items
- Shoelaces: Your boot laces are a readily available source of strong cordage. They can be used to lash straps, reinforce broken points, or even create a new, albeit short, binding strap.
- Clothing Strips: If you have spare clothing (e.g., a bandana, a spare sock, or even a strip torn from a non-essential garment), these can be used to create temporary straps or padding for abrasive repairs.
- Ski Straps: If you're also carrying skis, the heavy-duty rubber ski straps are incredibly versatile for snowshoe repairs, offering excellent elasticity and grip.
Natural Materials (Use with Caution)
In extreme emergencies, you might look to the environment. Strips of strong bark (e.g., willow, spruce), tough roots, or even frozen branches can be used, but their reliability is highly variable. This should be a last resort, as such materials are often brittle in the cold and prone to failure. Always prioritize getting to safety with a temporary, functional repair rather than attempting a 'perfect' natural solution.
| Repair Item | Primary Use | Strength | Versatility |
|---|---|---|---|
| Zip Ties | Straps, Buckles | High | Very High |
| Duct Tape | Reinforcement, Patches | Medium | High |
| Cordage | Lashing, New Straps | High | High |
| Wire | Pivot Points, Structural | Very High | Medium |
| Shoelaces | Improvised Straps | Medium | Medium |
Advanced Repair Strategies for Remote Situations
Sometimes, a simple zip tie isn't enough. For prolonged travel after a significant binding failure, more robust, temporary solutions are required. These strategies aim to restore as much function as possible to minimize the risk of further injury or fatigue.
Creating a Semi-Permanent Lashing System
If a primary strap or buckle system is irrevocably broken, you might need to construct an entirely new lashing system using your cordage. This involves creating a harness-like setup that distributes pressure across your boot and the snowshoe frame. According to NOLS (National Outdoor Leadership School) principles, redundancy is key in the backcountry. Use multiple points of attachment and ensure knots are secure and will not loosen with movement.
Reinforcing Compromised Decking
If the decking around a binding attachment point has torn, a simple tape patch might not hold. You can create a 'washer' out of a piece of thin, rigid plastic (e.g., from a water bottle, if available and safe to cut) and place it under the attachment point before re-screwing or lashing. This distributes the stress over a larger area, preventing the tear from propagating further. Duct tape can then be used to seal the area.
The 'Barefoot' Snowshoe Method (Extreme Last Resort)
In a truly desperate situation where your boot cannot be secured to the snowshoe, you might have to resort to removing your boot and securing your foot (with multiple layers of socks and any available insulation) directly into the binding. This is extremely uncomfortable and risky due to exposure, but it might be the only way to utilize the flotation of the snowshoe itself. I only mention this as an absolute last resort, a survival tactic, not a recommended repair. Always prioritize maintaining boot integrity and warmth.
Preventative Measures: Gear Selection and Usage Best Practices
Even the best repair kit is no substitute for well-maintained, high-quality gear and responsible usage. Investing in durable snowshoes and adopting smart practices can significantly reduce your chances of experiencing a binding failure.
Choosing Durable Bindings
When selecting snowshoes for remote expeditions, prioritize durability and simplicity over lightweight or complex designs. Look for bindings with robust metal buckles, thick, cold-weather-rated plastic straps, and secure pivot mechanisms. Read reviews from sources like Outdoor Gear Lab that focus on long-term durability in harsh conditions. While lightweight options are tempting, they often sacrifice strength.
Proper Foot Placement and Technique
Many binding failures are user-induced. Avoid unnecessary stress on your bindings by practicing good snowshoeing technique. Lift your feet, don't drag. Avoid kicking rocks or submerged obstacles. When stepping over logs or obstacles, lift your entire snowshoe clear rather than pivoting awkwardly. Be mindful of your steps, especially on variable terrain or icy patches. As REI's expert advice often emphasizes, proper technique reduces strain on both your body and your gear.
Storage and Off-Season Care
How you store your snowshoes impacts their longevity. Clean them thoroughly after each use, removing all dirt, salt, and ice. Store them in a cool, dry place away from direct sunlight and extreme temperature fluctuations. Loosen straps to relieve tension during storage. This prevents material fatigue and degradation over the off-season, ensuring they're ready for your next adventure.
Expert Insight: "A cheap binding will cost you more than money; it can cost you safety and comfort in the backcountry. Invest wisely, maintain diligently, and practice your repairs."
Training and Practice: Honing Your Field Repair Skills
Knowing what to do is one thing; being able to execute it under pressure in freezing conditions is another. Field repair skills are perishable and require regular practice. Don't let your first binding repair be in a blizzard.
Simulated Field Repairs at Home
Before your expedition, intentionally 'break' an old, expendable binding or simulate a failure on your current snowshoes. Then, using only the items in your repair kit, attempt to fix it. Time yourself. Do it with cold hands (e.g., after putting them in a bucket of ice water for a minute or two). This builds muscle memory and confidence. Practice in your expedition gloves to ensure dexterity.
Integrating Repair Drills into Training
If you train with a group, incorporate binding repair drills into your outings. Have someone simulate a failure and the rest of the group practices troubleshooting and repair. This fosters teamwork and collective problem-solving, which is crucial in remote environments. Consider taking a wilderness first aid or outdoor survival course that includes gear repair segments, as offered by institutions like the Wilderness Medical Society.
Understanding Your Specific Gear
Every snowshoe and binding system is slightly different. Spend time understanding how your specific bindings attach, articulate, and can be disassembled (and reassembled). This intimate knowledge will be invaluable when you need to improvise a repair in challenging conditions. Don't wait until a crisis to learn your gear's intricacies.
Frequently Asked Questions (FAQ)
What's the most common snowshoe binding failure I should prepare for? In my experience, broken plastic straps and buckles are by far the most common failure points. They're exposed to continuous flexing, impacts, and extreme cold, leading to brittleness and snapping. Always prioritize having robust solutions like zip ties and strong cordage for these.
Can I use super glue or epoxy for field repairs? While a small tube of cold-weather epoxy can be part of an advanced kit for more permanent repairs, super glue is generally unreliable in extreme cold and on flexible materials. Epoxy requires specific curing conditions (temperature, time) that are often impossible to achieve in the backcountry. Focus on mechanical fixes like lashing, tying, and taping for immediate, reliable results.
How often should I inspect my snowshoe bindings? You should perform a detailed inspection before every single expedition, no matter how short. For multi-day trips, a quick visual check should be part of your daily routine when packing up camp. After a particularly strenuous trip or if you've experienced any hard impacts, a more thorough post-trip inspection is also advisable.
Are certain binding types inherently more prone to failure than others? Generally, simpler, more robust designs with fewer moving parts and thicker, cold-resistant materials tend to be more reliable. Bindings with complex ratchet systems or very thin, intricate plastic components can be more susceptible to failure in extreme cold or under heavy use. Always research reviews focusing on long-term durability.
What's the absolute minimum repair item I should carry if I'm trying to go ultralight? If you absolutely must go ultralight, I would say a few heavy-duty zip ties (at least 6-8), 10-15 feet of utility cord, and a small amount of duct tape wrapped around a trekking pole or lighter. This minimal kit covers the most common and critical failures, but remember, ultralight often means increased risk.
Key Takeaways and Final Thoughts
- Proactive Maintenance is Paramount: Regular inspection and care significantly reduce failure risk.
- Carry a Comprehensive Repair Kit: Zip ties, duct tape, cordage, and a multi-tool are non-negotiable.
- Master Field Repair Techniques: Practice makes perfect, especially for broken straps, buckles, and pivot points.
- Embrace Improvised Solutions: Be creative with shoelaces, clothing, or even natural materials if your kit is limited.
- Invest in Durable Gear: Choose robust bindings over flimsy, lightweight options for remote travel.
- Practice, Practice, Practice: Simulate repairs at home and in the field to build confidence and muscle memory.
The wilderness demands respect, and part of that respect is unwavering preparedness. Snowshoe binding failures during remote winter expeditions are not just inconveniences; they are genuine threats to your safety and the success of your journey. By internalizing the strategies and insights shared here, you transform from a potential victim of circumstance into a self-reliant, capable winter traveler. Go forth, explore, and do so with the confidence that you're ready for whatever the trail throws your way. Stay safe, stay warm, and keep moving!
Recommended Reading
- Solo Camera Security: 7 Ways to Beat Gear Theft Risk Abroad
- 5 Pro Strategies: Unexpected Dietary Restrictions on Culinary Tours?
- 7 Proven Strategies: How to Stop Overtourism Harming National Park Ecosystems
- Unlock Your Dream: How to Afford Long-Term Volunteer Travel Abroad
- 7 Expert Strategies: How to Halt Cultural Event Trip Cancellations

Your email address will not be published. Required fields are marked *