
How to make unphotogenic but delicious street food look appealing?
For over 15 years, I've traversed bustling markets and hidden alleys across the globe, chasing flavors that tell stories. In my journey through the vibrant world of food travel, I've encountered countless dishes that are an absolute symphony for the palate but, let's be honest, a nightmare for the lens. I've seen some of the most incredibly delicious street foods – rich stews, gooey noodles, or rustic, earthy delights – get overlooked simply because their visual presentation didn't match their extraordinary taste.
This is a common pain point for food travelers and content creators alike. In an age where 'eating with your eyes' has never been more literal, the inability to translate an amazing culinary experience into an appealing photograph means losing out on engagement, audience connection, and ultimately, the chance to share these incredible edible stories. You know the struggle: you take a bite, your eyes roll back in pure bliss, then you look at your camera roll, and all you see is a brown, shapeless blob that fails to convey any of that magic.
But what if I told you there are proven, expert-level strategies to bridge this gap? In this definitive guide, I'll share the frameworks, techniques, and insights I’ve honed over years of professional food photography on the streets. You'll learn not just what to do, but how to transform even the most challenging street food into a visual feast, ensuring its deliciousness shines through every pixel. Let's dive in and elevate your street food photography game.
Understanding the "Unphotogenic" Challenge: Beyond the Plate
Before we can fix a problem, we must first truly understand it. In my experience, the term "unphotogenic" in street food often boils down to a few recurring culprits. It's rarely about the food itself being inherently ugly, but rather its typical presentation and inherent characteristics.
Identifying Common Pitfalls of Street Food Photography
Often, the most delicious street foods are designed for speed and convenience, not for a photoshoot. This leads to common challenges like:
- Monochromatic Palettes: Many hearty stews, curries, or noodle dishes lean heavily on browns, greys, and muted tones. While rich in flavor, they lack visual contrast.
- Messy Presentation: Street food is often served in simple containers, sometimes overflowing, with sauces and ingredients mingling in a way that’s delicious to eat but hard to frame elegantly.
- Grease and Shine: Fried items or saucy dishes can appear overly greasy under certain lights, making them look unappetizing rather than succulent.
- Lack of Definition: Minced meats, mashed ingredients, or heavily sauced dishes can lose their individual textures and shapes, appearing as a single, undifferentiated mass.
I've seen countless photographers give up at this stage, thinking the food is simply impossible to capture. But this is where the true artistry begins.
The Psychological Aspect of Food Perception
Our brains are wired to associate certain visual cues with deliciousness. Vibrant colors, distinct textures, freshness, and a sense of warmth or crispness all contribute to how appealing food looks. When these cues are absent or obscured, even the most flavorful dish can fall flat visually. A study published in the journal Appetite highlighted how visual cues can significantly impact perceived taste, proving that our eyes truly do eat first. This isn't just about making things look pretty; it's about communicating flavor and experience visually.
As a seasoned food traveler, I've learned that the 'unphotogenic' label is often a challenge of perception, not an inherent flaw in the food. Our job as photographers is to guide that perception.
Mastering Light: The Single Most Important Ingredient
If there's one piece of advice I could give any aspiring food photographer, it's this: understand and master light. Light is the sculptor of your image, defining textures, colors, and mood. For street food, where you have little control over your environment, this skill becomes even more crucial for how to make unphotogenic but delicious street food look appealing.
Natural Light vs. Artificial Light for Street Food
Natural light is almost always your best friend on the streets. It's soft, flattering, and abundant. Look for:
- Overcast Days: The clouds act as a giant softbox, diffusing harsh sunlight and creating even, beautiful light.
- Shaded Areas: Under an awning, a large tree, or even inside a doorway provides diffused light that avoids harsh shadows and blown-out highlights.
- Window Light: If shooting indoors, position the food near a window. The light will be directional yet soft.
Artificial light can be tricky. Fluorescent lights often cast an unflattering green or yellow hue. If you must use it, try to mitigate it by adjusting your camera's white balance or using a small LED panel with adjustable color temperature, but always prioritize natural light if available.
Angles and Diffusion Techniques on the Go
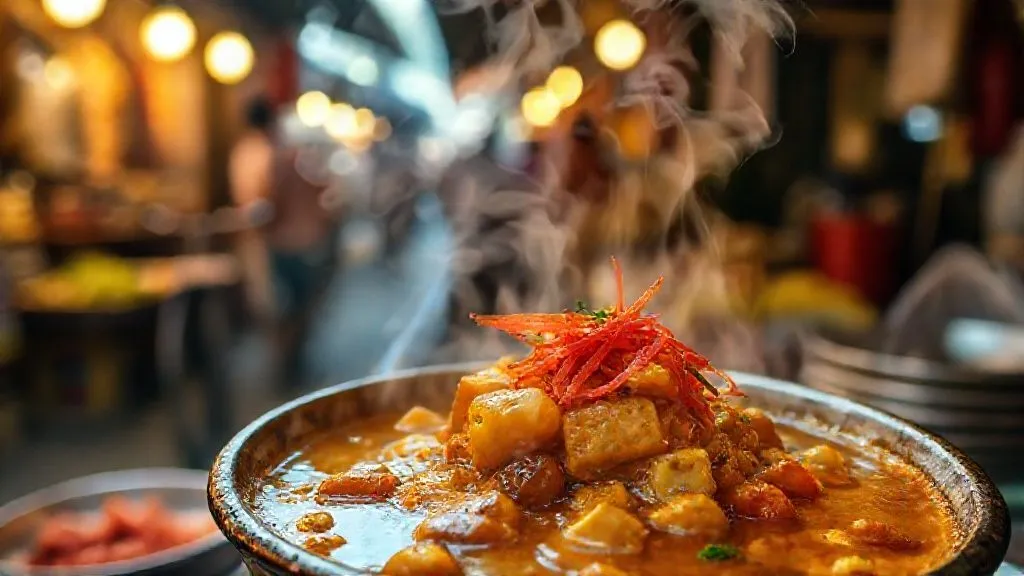
- Backlighting or Side-Lighting: Position the light source behind or to the side of your dish. This highlights steam, adds depth, and creates beautiful rim lighting around textures, making even a simple broth look ethereal. Avoid direct front lighting, which flattens the image.
- Using a Diffuser: A small, collapsible diffuser is a street photographer's secret weapon. If the sun is too harsh, hold it between the sun and your food to soften the light. You can even use a thin white napkin in a pinch!
- Reflectors: A small white card (the back of a menu, a piece of cardboard) can bounce light back into the shadows, brightening up darker areas and adding dimension. This is particularly useful for adding sparkle to sauces or bringing out details in deep bowls.
I remember shooting a particularly rustic bowl of 'Lomi' (Filipino noodle soup) in Cebu. It was a delicious, hearty brown mess. By simply moving it slightly to catch the dappled light filtering through an old awning and using a white napkin as a makeshift reflector, the steam became visible, the fried garlic bits popped, and the entire dish gained an irresistible warmth. It's these small, intentional adjustments that make all the difference.

Composition & Framing: Turning Chaos into Art
Street food environments are often chaotic, vibrant, and full of life – which is fantastic for storytelling but challenging for a clean composition. Your goal is to isolate your subject while still hinting at its authentic surroundings.
Rule of Thirds and Leading Lines in Busy Environments
The Rule of Thirds is your foundational guide. Imagine your frame divided into nine equal parts by two horizontal and two vertical lines. Place your main subject (the dish) at one of the intersections or along one of these lines. This creates a more dynamic and engaging image than simply centering everything.
Leading Lines are paths that draw the viewer's eye towards your subject. In a street setting, this could be the edge of a counter, a row of ingredients, or even the lines of a serving bowl. Use these natural elements to guide the eye directly to your delicious street food.
The Power of Negative Space and Selective Focus
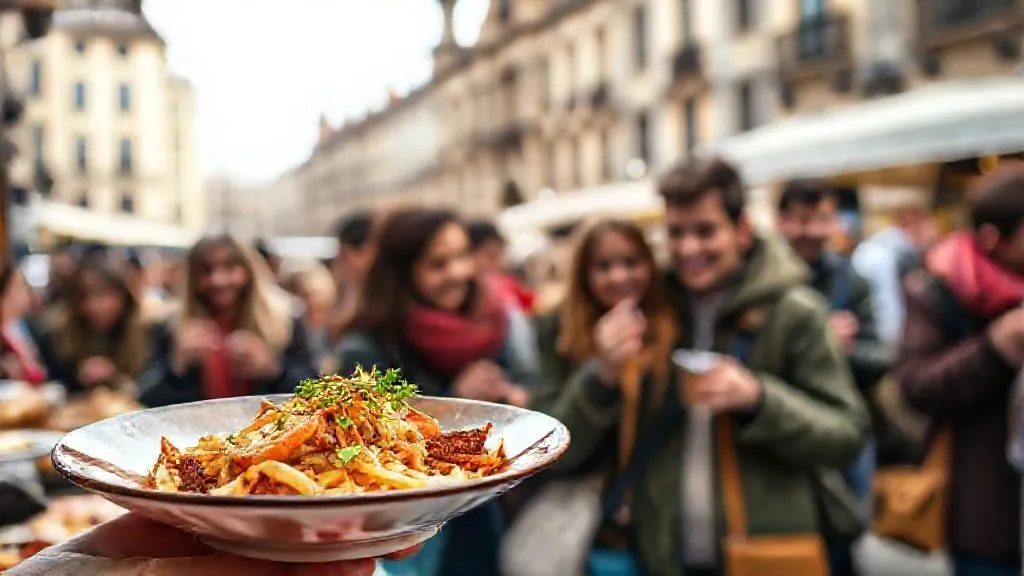
Negative space isn't empty; it's the area around and between your subject. For street food, this might be a simple wooden table, a plain wall, or even a blurred background of the market. Using negative space helps your subject breathe and stand out, preventing it from getting lost in a busy frame. It simplifies the image, allowing the viewer to focus on the food.
Selective focus (achieving a shallow depth of field) is paramount. By focusing sharply on your dish and blurring the background (the bokeh effect), you immediately draw attention to the food. This is particularly effective for how to make unphotogenic but delicious street food look appealing, as it can hide distracting elements in the background while making the food pop with clarity. Even smartphone cameras now offer excellent portrait modes that simulate this effect. Experiment with getting closer to your subject to enhance this separation.
Strategic Styling: Elevating Simple Ingredients
Street food isn't about elaborate plating, but that doesn't mean you can't apply strategic styling principles. It's about enhancing what's already there, making it look its absolute best without fabricating anything.
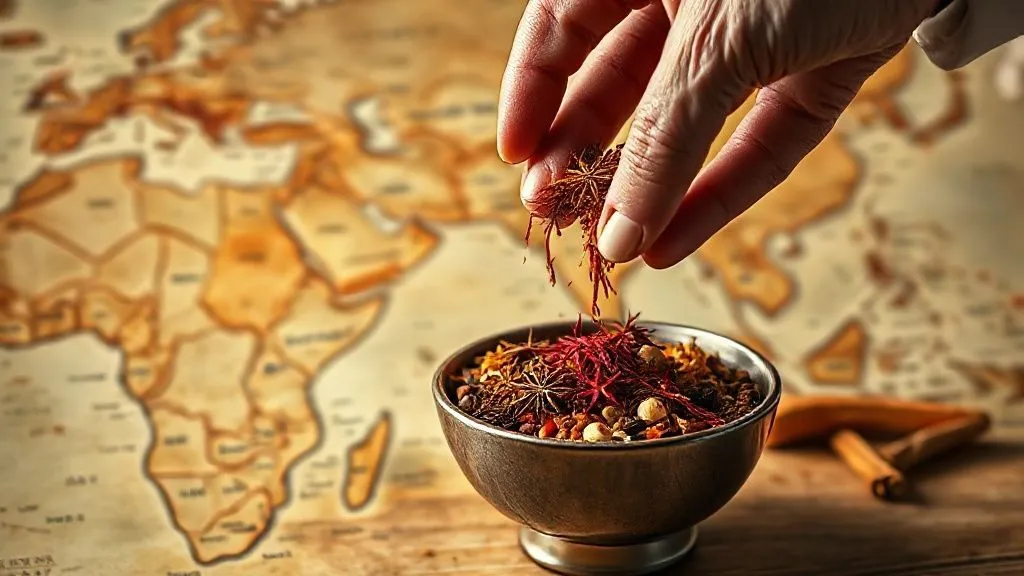
Garnishes That Pop: Herbs, Spices, Citrus
Even the simplest street food can be elevated with a thoughtful garnish. These aren't just for flavor; they add crucial visual interest, color, and texture. Consider:
- Fresh Herbs: A sprig of cilantro, mint, or basil can add a burst of green and a sense of freshness.
- Chili Flakes or Powder: Adds a touch of vibrant red or orange, suggesting spice and warmth.
- Lime or Lemon Wedges: A pop of bright yellow or green, indicating zest and cutting through richness.
- Toasted Seeds/Nuts: Adds crunch, texture, and a rustic appeal.
- A Drizzle of Sauce: If a contrasting sauce is available, a small, artful drizzle can create visual lines and enhance appeal.
Always ask the vendor if they have any extra garnishes available. Most are happy to oblige a curious photographer. A simple sprinkle can transform a dull-looking dish into something dynamic.
The Art of the "Action Shot": Steam, Drizzle, Bite
Static food photos can be good, but action shots tell a story and evoke a sensory experience. These are particularly powerful for street food, which is often consumed on the go.
- Capturing Steam: This communicates warmth, freshness, and deliciousness. Use backlighting to make steam visible. Be ready to shoot as soon as the dish is served.
- The Drizzle: A spoonful of sauce being poured, a squeeze of lime, or a sprinkle of spice mid-air. These moments add dynamism.
- The Bite/Lift: A fork or chopsticks lifting a perfect bite, revealing layers and textures. This makes the food feel approachable and real.
- Hands in Frame: Human hands interacting with the food add a personal touch and a sense of scale. They also reinforce the street food experience.
These techniques require quick reflexes and often multiple shots, but the results are incredibly rewarding. They help answer the question of how to make unphotogenic but delicious street food look appealing by adding a layer of authenticity and vitality.

| Garnish Type | Visual Benefit | Best For |
|---|---|---|
| Fresh Herbs (Cilantro, Mint) | Adds vibrant green color, freshness, delicate texture. | Soups, curries, tacos, salads. |
| Chili Flakes/Powder | Adds fiery red/orange, suggests spice & warmth. | Noodle dishes, stews, grilled meats. |
| Citrus Wedges (Lime, Lemon) | Bright yellow/green pop, indicates zest, cuts richness. | Seafood, fried items, rich stews. |
| Toasted Seeds/Nuts | Adds crunch, earthy texture, rustic appeal. | Rice dishes, salads, stir-fries. |
| Drizzle of Contrasting Sauce | Creates visual lines, adds depth and richness. | Any dish with a complementary sauce available. |
Props & Backgrounds: Setting the Scene Authentically
While the focus is on the food, the environment plays a critical role in setting the mood and providing context. For street food, authenticity is key. You don't need elaborate studio props; the street itself provides everything you need.
Using Local Textures and Colors
Look around you! The textured wooden table at a hawker stall, a rustic metal tray, a colorful patterned cloth, or even the rough concrete of the street itself can serve as an excellent background. These elements ground your food in its environment and tell a story about its origin. Pay attention to the colors – complementary colors can make your food pop, while analogous colors create a harmonious feel. A vibrant red chili dish against a muted wooden background, for example, creates a compelling contrast.
Minimizing Distractions, Enhancing Authenticity
The challenge with street food is often too much information in the background. Your goal is to simplify. This doesn't mean removing everything; it means being selective.
- Blur the Background: As discussed with selective focus, this is your primary tool.
- Angle Your Shot: Sometimes, simply shifting your angle by a few inches can eliminate a distracting sign or an unwanted person.
- Clean Your Immediate Area: A quick wipe of the table or moving a stray napkin can make a huge difference without altering the authenticity.
- Incorporate Relevant Elements: A vendor's hand, a unique serving utensil, or a glimpse of the cooking process in the background can enhance authenticity rather than distract.
Authenticity isn't about perfection; it's about truthful representation. Don't sanitize the scene entirely; just curate it to serve your narrative.
I once photographed a bowl of 'Mohinga' (Burmese fish noodle soup) in Yangon. The stall was bustling, and the lighting was challenging. Instead of trying to find a perfectly clean background, I embraced the chaos. I used a shallow depth of field to keep the focus on the steaming noodles but allowed the blurred figures of the vendors and the vibrant market colors to remain in the background, adding context and a sense of place. The result was a photo that not only showcased the food but also told the story of where it came from.
Post-Processing Magic: Enhancing, Not Faking
Even the best raw photo can benefit from thoughtful post-processing. This isn't about creating something that wasn't there; it's about bringing out the best in what you captured. Think of it as developing a film negative – you're refining, not inventing.
Essential Edits: Contrast, Saturation, Sharpness
These three are your fundamental tools for making unphotogenic street food look appealing:
- Contrast: Many street foods, especially those with monochromatic palettes, can look flat. Increasing contrast adds depth and makes ingredients pop. Be careful not to overdo it, or you'll lose detail in shadows and highlights.
- Saturation & Vibrance: This is where you can make those garnishes sing. A slight boost in saturation can bring out the rich reds of chili or the fresh greens of herbs. Use 'Vibrance' for a more natural boost that affects muted tones more, and 'Saturation' for an overall color intensity increase.
- Sharpness: Even with perfect focus, a touch of sharpening can make textures incredibly crisp and appealing. Apply it carefully, especially to the areas you want to highlight, like the crispy bits or the edges of ingredients.
Color Correction for True-to-Life Representation
Street lighting, particularly artificial light, can cast unwanted color casts. Correcting your white balance is crucial. Most editing software (even on smartphones) allows you to adjust temperature (warm/cool) and tint (green/magenta). Aim for colors that are true to how the food looked in person, or even slightly enhanced to evoke its deliciousness. For more advanced control, explore split toning or HSL (Hue, Saturation, Luminance) adjustments to fine-tune specific color ranges without affecting the entire image. For a deeper dive into color theory in photography, I often refer to resources like Adobe's guide on color theory.
The Storyteller's Lens: Capturing the Experience
Food photography, especially street food photography, is about more than just the dish. It's about the culture, the people, and the experience surrounding that meal. This narrative element is incredibly powerful for how to make unphotogenic but delicious street food look appealing because it adds context and humanity.
People, Hands, and the Environment
Don't be afraid to include elements that tell a broader story:
- The Vendor: A candid shot of the vendor preparing the food, their skilled hands, or their smiling face adds immense character and authenticity. Always ask for permission first.
- Local Patrons: People enjoying the food, in the background, or even interacting with the vendor, create a lively scene.
- Hands in Frame: As mentioned earlier, hands holding the dish, stirring, or reaching for a bite connect the viewer to the experience.
- The Setting: A blurred market scene, a unique street sign, or the architecture surrounding the stall can provide crucial context.
These elements transform a simple food photo into a slice of life, making the food itself more relatable and desirable.
The Narrative Behind the Dish
Every street food dish has a story – its origins, its cultural significance, the effort involved in its preparation. Your photography can hint at this narrative. Is it a generational recipe? Is it a staple of a particular festival? Is it known for its unique ingredients?
Case Study: The Humble Noodle Stand's Viral Moment
I recall a small, unassuming noodle stand in Hanoi, Vietnam. Their 'Bun Cha' was legendary, but visually, it was a simple bowl of grilled pork, rice noodles, and broth. Many photographers struggled to capture its magic. One photographer, however, didn't just photograph the bowl. They captured the vendor's weathered hands meticulously grilling the pork over charcoal, the steam rising from the simmering broth, and a shot of a local family happily slurping noodles, their faces alight. The resulting series of images, posted on social media, didn't just showcase a dish; it told a story of tradition, craft, and community. This approach made the 'unphotogenic' dish incredibly appealing, leading to a surge in international visitors to that very stand. It wasn't just about the food; it was about the experience.

Practical Gear for the Street Food Photographer
While I always advocate for skill over gear, having the right tools can certainly make your life easier and your results more consistent, especially when tackling the challenge of how to make unphotogenic but delicious street food look appealing.
Essential Tools: Mobile vs. DSLR, Diffusers, Reflectors
Your Camera:
- Smartphone: Modern smartphones (iPhone, Google Pixel, Samsung Galaxy) are incredibly capable. Their computational photography excels in tricky lighting, and portrait mode provides that crucial shallow depth of field. They are discreet and always with you.
- Mirrorless/DSLR: For ultimate control over aperture, shutter speed, and ISO, and for superior image quality in challenging light, a dedicated camera is best. A versatile prime lens (e.g., 50mm f/1.8 or 35mm f/1.8) is lightweight and excellent for food photography.
Accessories:
- Small Diffuser/Reflector: As mentioned, these are invaluable for controlling light. Collapsible 5-in-1 reflectors are compact and versatile.
- Cleaning Cloth: Always have one for smudges on your lens or screen, or for a quick wipe of a messy surface.
- Portable Power Bank: Essential for keeping your phone or camera charged during a long day of shooting.
- Small Tripod (Optional): For very low light situations or if you want to experiment with longer exposures, a compact tabletop tripod can be useful.
Keeping It Light and Functional
When on the street, mobility is key. You'll be moving, standing, crouching, and navigating crowds. My advice is always to carry the minimum amount of gear you need to get the shot. A heavy camera bag can quickly become a burden and distract you from the experience. Focus on lightweight, versatile tools. Remember, the best camera is the one you have with you, and often, that's your smartphone.
For a comprehensive guide on minimalist travel photography gear, I often recommend checking out expert opinions on sites like B&H Explora's street photography gear guides.
| Gear Item | Pros | Cons | Best Use Case |
|---|---|---|---|
| Smartphone (e.g., iPhone 15 Pro) | Always with you, excellent computational photography, discreet, good for social media. | Less manual control, smaller sensor, limited lens options. | Spontaneous shots, quick shares, minimalist travel. |
| Mirrorless Camera (e.g., Sony Alpha a7C II) | Superior image quality, interchangeable lenses, full manual control, great in low light. | More expensive, heavier, can be less discreet. | Professional quality, creative control, larger prints. |
| Small Collapsible Diffuser/Reflector | Controls harsh light, fills shadows, lightweight, inexpensive. | Requires an extra hand or stand, can be cumbersome in very crowded spaces. | Improving natural light, adding sparkle to food. |
| Portable Power Bank | Keeps devices charged, essential for long shooting days. | Adds weight, another item to remember. | All-day photography, remote locations. |
Frequently Asked Questions (FAQ)
What if the lighting is truly terrible, like indoors under harsh fluorescent lights? This is a tough one, but not insurmountable. First, try to find any natural light source, even a distant window. If not, try to position the food so the fluorescent light is behind it (backlighting) and use a white napkin to reflect some light back onto the front. If you have a small, portable LED light with adjustable color temperature, use it. Failing all else, prioritize composition and focus, knowing you'll rely heavily on post-processing for color correction and contrast adjustments. Embrace the mood if it's too challenging to fight the light.
How do I avoid making messy street food look even messier in photos? The trick is to find the 'hero' elements. Instead of trying to clean up every spill, focus on the most appealing part of the dish. Is it a perfectly grilled piece of meat? A vibrant garnish? Use selective focus to highlight that element, letting the 'mess' blur into the background. A slight angle change can also minimize the visibility of less appealing areas. Sometimes, a controlled 'mess' (like a sauce drizzle caught mid-action) can actually add authenticity and dynamism.
Should I always use a DSLR or mirrorless camera for professional-looking street food photos? Absolutely not! While DSLRs/mirrorless offer more control and higher image quality, modern smartphones are incredibly powerful. Many professional food bloggers and photographers use their phones extensively, especially for street food where discretion and speed are assets. Focus on understanding light, composition, and storytelling – these skills are far more important than the camera body itself. Your phone, used expertly, will yield better results than a high-end DSLR used poorly.
How much editing is too much when it comes to street food? This is a subjective line, but my rule of thumb is: enhance, don't invent. You want to bring out the true deliciousness and vibrancy of the food, correcting for technical flaws (white balance, exposure, contrast) and making colors pop naturally. Avoid over-saturating, creating unrealistic colors, or adding elements that weren't there. The goal is to make the food look as good as it tasted, not to create a fantasy. Authenticity is a core value in street food photography.
How do I deal with crowds and people getting in my shot in a busy market? Patience is a virtue here. Wait for a lull, even a brief one. Use a shallow depth of field to blur out distracting people in the background. Sometimes, incorporating people in a blurred, contextual way can enhance the shot's authenticity rather than detract from it. Shoot from a lower angle to eliminate eye-level distractions, or from a slightly elevated position if possible. Being quick and discreet also helps; pre-compose your shot and wait for the perfect moment to click.
Key Takeaways and Final Thoughts
Photographing street food, especially those delicious but visually challenging dishes, is a rewarding art form that requires a blend of technical skill, creative vision, and a deep appreciation for the culinary culture. It’s a pursuit I've dedicated a significant part of my career to, and these are the insights I wish I had when I first started.
- Embrace the Challenge: Don't shy away from 'unphotogenic' food; see it as an opportunity to hone your skills.
- Master Light: It's the most powerful tool in your arsenal. Seek out diffused natural light and use it strategically.
- Compose with Purpose: Use framing, angles, and selective focus to make your subject stand out from the chaos.
- Style Smart, Not Hard: Simple garnishes and action shots can dramatically elevate visual appeal without compromising authenticity.
- Tell a Story: Beyond the food, capture the people, the place, and the experience. This connection makes any dish more compelling.
- Process Thoughtfully: Enhance your images to reflect their true deliciousness, but always maintain authenticity.
Remember, every single dish, no matter how humble its appearance, holds a story and a flavor waiting to be celebrated. Your lens is the bridge between that culinary secret and a global audience. By applying these expert strategies, you'll not only learn how to make unphotogenic but delicious street food look appealing, but you'll also deepen your connection to the food, the culture, and the art of visual storytelling. Now go forth, explore, taste, and capture the irresistible spirit of street food!
For more inspiration and a community of passionate food photographers, consider joining online forums or following leading food travel photographers on platforms like National Geographic's Instagram or Eater.com, which often feature stunning food travel content.
Recommended Reading
- Mitigate Zip Line Liability: 7 Steps for Corporate Team Events
- Unlocking Global Flavors: How to Truly Appreciate Different Coffee Cultures
- Transform Your Day: The Power of Short Mindfulness Breaks for Busy Pros
- The Ethical Safari Secret: How to Choose a Wildlife Adventure That Protects Animals
- Navigating Ethical Sourcing: 7 Key Challenges for Cultural Travel & Crafts

Your email address will not be published. Required fields are marked *