
How to repair glamping geodome damage from extreme weather?
For over 15 years in the unique world of glamping, I've witnessed the incredible allure and robust design of geodomes. They offer an unparalleled connection to nature, but I've also seen the heartbreaking aftermath when Mother Nature decides to truly test their limits. The sight of a once-pristine dome, now crumpled by snow, ripped by gale-force winds, or compromised by relentless rain, is a stark reminder of the challenges we face in offering these unique experiences.
The pain point is visceral: a damaged geodome isn't just a structural issue; it's a financial hit, a logistical nightmare, and a blow to the dream you've built. Guests are inconvenienced, bookings are lost, and the sheer scale of the repair can feel overwhelming. Many owners, especially those new to glamping, often panic, making critical mistakes in their initial assessment or repair attempts that can exacerbate the damage or lead to even costlier fixes down the line.
But here's the good news: most extreme weather damage to glamping geodomes is repairable, provided you approach it with the right knowledge, tools, and a systematic plan. In this definitive guide, I'll walk you through a proven framework, drawing on years of hands-on experience and real-world scenarios, to not only repair your geodome effectively but also to reinforce it against future threats. You'll gain actionable steps, expert insights, and the confidence to tackle even the most daunting damage, ensuring your glamping haven continues to thrive.
Immediate Assessment: The First 24 Hours After the Storm
When extreme weather strikes, your immediate response is critical. Panic is a natural reaction, but a calm, methodical approach will save you time, money, and potential further damage. Think of this as your emergency protocol.
Safety First: Prioritizing Personal Well-being
Before you even think about inspecting your geodome, ensure the area is safe. I've seen countless well-meaning owners rush in only to encounter hidden dangers. Look out for downed power lines, unstable trees, sharp debris, and slippery surfaces. If there's any doubt about structural integrity, especially after heavy snow or wind, do not enter the dome. Wait for professional assessment if necessary. Your safety, and the safety of anyone assisting you, is paramount.
Documenting the Damage for Insurance and Future Reference
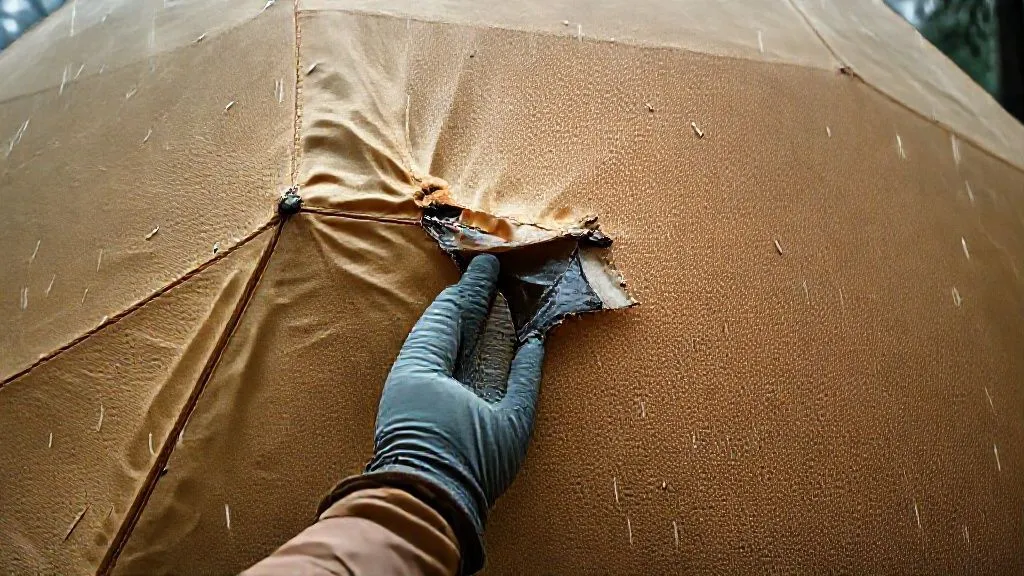
This step is non-negotiable. As soon as it's safe, grab your smartphone or a camera and start documenting everything. Take wide shots showing the overall condition and close-ups of specific damage points. Capture torn fabric, bent struts, compromised anchors, and any interior water ingress. Narrate your videos, describing what you see. This detailed record is invaluable for insurance claims and will serve as a precise roadmap for your repair efforts. Remember, the more evidence you have, the smoother the claims process often is.

Understanding Geodome Vulnerabilities to Extreme Weather
To effectively repair and prevent future damage, you need to understand how different types of extreme weather impact geodomes. It's not just about patching a hole; it's about addressing the root cause and the specific stresses applied.
Wind Damage: Rips, Tears, and Structural Stress
High winds are a geodome's most common adversary. They create immense uplift and shear forces, particularly on the fabric cover. I've seen wind literally 'peel' covers off frames, rip seams, and even cause catastrophic tears in the middle of panels. Beyond the fabric, sustained wind can stress connection points, loosen anchor bolts, and, in severe cases, even bend or fracture the steel or aluminum struts themselves if the dome isn't adequately anchored or its design is compromised. The key here is understanding that wind acts on the entire structure, not just isolated points.
Snow Load: Compression and Frame Distortion
Heavy snowfall, especially wet, dense snow, poses a significant risk due to its sheer weight. Geodomes are designed to distribute loads efficiently, but excessive snow can exceed their design limits. This leads to compressive stress on the struts, potentially causing them to buckle or deform. Connection points can also fail under the immense downward pressure. In extreme cases, the entire dome can collapse. Regions prone to heavy snow require specific dome designs with stronger frames and anti-snow features like steeper pitches or heating systems to prevent accumulation. Regularly clearing snow is a must.
UV Degradation and Rain: Leaks and Material Fatigue
While not as sudden as wind or snow, prolonged exposure to UV radiation and heavy rain causes insidious damage. UV rays degrade the fabric's polymers over time, making it brittle, faded, and prone to cracking or tearing under stress. Rain, especially when combined with wind, can exploit the smallest pinholes or compromised seams, leading to leaks that damage interiors and create mildew. I've often seen what appears to be a small leak turn into a major issue because the fabric's integrity has been slowly eroded by years of sun exposure. Regular inspection for UV damage and seam integrity is crucial.
| Weather Type | Typical Damage | Primary Repair Focus |
|---|---|---|
| High Winds | Fabric rips, seam separation, anchor failure, bent struts | Fabric patching, re-anchoring, frame straightening/replacement |
| Heavy Snow Load | Frame buckling, connection point failure, fabric stress tears | Frame reinforcement/replacement, structural integrity check |
| Torrential Rain / UV | Leaks, fabric degradation, mildew, faded material | Seam sealing, fabric patching, UV protective coatings, interior drying |
Essential Repair Toolkit and Materials
Having the right tools and materials on hand is half the battle. Don't wait until disaster strikes to gather these essentials. Think of this as your glamping geodome's first-aid kit.
- Heavy-Duty Tarpaulin or Emergency Tarp: For immediate, temporary cover over large rips.
- Industrial-Strength Fabric Repair Kit: Look for kits specifically designed for PVC, architectural fabric, or marine-grade canvas. These typically include adhesive, patches, and applicators.
- Heat Gun or Industrial Hair Dryer: Essential for heat-welding PVC patches for a truly durable, waterproof seal.
- Seam Sealer/Waterproofing Spray: For compromised seams or minor leaks.
- Silicone or Polyurethane Sealant: For sealing around penetrations or small gaps.
- Ratchet Straps and Ropes: For temporary stabilization or pulling fabric taut.
- Gloves and Safety Glasses: Always prioritize personal protection.
- Measuring Tape and Marker: For precise cutting and marking.
- Utility Knife or Heavy-Duty Shears: For clean cuts of patching material.
- Replacement Struts/Connectors (if applicable): Having spares for common strut lengths or connection types can be a lifesaver.
- Wrenches and Socket Set: For tightening bolts on the frame or anchors.
- Ladder or Scaffolding: For safe access to higher sections of the dome.

Step-by-Step Geodome Fabric Repair
The fabric cover is your geodome's primary protective layer. Repairing it correctly is paramount for maintaining weather integrity and longevity. This is where precision and quality materials make all the difference.
Patching Minor Tears and Punctures
For smaller damage, a well-applied patch can be as strong as the original material. I always advise cleaning the area thoroughly first – dirt and grime prevent good adhesion. Cut your patch with rounded corners, at least 2 inches larger than the damage on all sides. Apply the adhesive evenly to both the patch and the dome fabric, following the manufacturer's instructions. Press firmly, working from the center outwards to eliminate air bubbles. For PVC fabrics, a heat gun can often be used to 'weld' the patch in place, creating a virtually seamless and incredibly strong bond. Always test a small, inconspicuous area first if you're new to heat welding.
Addressing Major Rips and Seam Failures
Large rips or failed seams require a more robust approach. A simple patch may not suffice. For very large tears, you might need to insert an internal patch first, then an external one, creating a sandwich effect. If a seam has failed, it often indicates stress on the surrounding material. You might need to clean and re-seal the entire seam length, potentially adding an external reinforcing strip. In some severe cases, especially if the fabric is old or extensively damaged, replacing an entire panel or even the whole cover might be the most cost-effective long-term solution. Never compromise on structural integrity for a quick fix.
- Assess the Damage: Determine if it's a minor tear, major rip, or seam failure.
- Clean the Area: Use rubbing alcohol or a mild degreaser to ensure the repair area is free of dirt, dust, and moisture. Let it dry completely.
- Cut the Patch: For tears, cut a patch from compatible material, ensuring it overlaps the damage by at least 2-3 inches on all sides. Round the corners to prevent peeling.
- Apply Adhesive: Apply a thin, even layer of industrial-strength adhesive to both the back of the patch and the dome surface. Follow adhesive manufacturer's instructions for cure time.
- Position and Press: Carefully align the patch over the damage. Press firmly, working from the center outwards to remove air bubbles. Use a roller if available.
- Heat Weld (for PVC/Tarpaulin): If using heat-weldable material, use a heat gun (on a low setting initially) to gently warm the patch and dome fabric, pressing firmly as you go. This creates a strong, waterproof bond. Be careful not to overheat and damage the material.
- Reinforce Seams: For failed seams, clean the area thoroughly. Apply a strong seam sealer or a reinforcing strip over the entire length of the compromised seam.
- Allow to Cure: Adhere to the adhesive's recommended curing time before exposing the dome to further stress or weather.
Structural Frame Integrity: Inspection and Reinforcement
The frame is the backbone of your geodome. Even if the fabric looks fine, extreme weather can compromise the underlying structure. A thorough inspection is paramount.
Identifying Bent or Fractured Struts
After a significant windstorm or heavy snow event, meticulously inspect every strut. Look for visible bends, kinks, or fractures, especially near connection points. Even a slight deformation can compromise the entire dome's structural integrity. Pay close attention to the struts at the base and those supporting the apex, as these often bear the brunt of compressive and tensile forces. If a strut is severely bent or fractured, it must be replaced. Attempting to straighten a bent strut can weaken it further, creating a dangerous failure point. Always source replacement parts directly from your dome manufacturer if possible, ensuring compatibility and material strength.
Reinforcing Connection Points
Connection points – the hubs where multiple struts meet – are critical. These are often the first points of failure under extreme stress. Check for loose bolts, cracked welds (if applicable), or deformation of the connection plates themselves. Tighten all bolts to the manufacturer's specifications. If you find any cracks or significant deformation, the connector should be replaced. I've often seen owners overlook these small details, only for the dome to fail in the next storm. Consider adding extra bracing or secondary fasteners to particularly vulnerable connection points, especially in high-wind zones, as a proactive measure.
"In my experience, 80% of major geodome structural failures after extreme weather could have been prevented by meticulous pre-storm inspection and proactive reinforcement of connection points. Don't underestimate the power of a tight bolt and a sound strut." - Industry Veteran's Insight
Proactive Measures: Preventing Future Extreme Weather Damage
Repair is reactive; prevention is proactive. Investing time in preventative measures will save you significant headaches and costs in the long run. As marketing guru Seth Godin often says, "The cost of being wrong is less than the cost of doing nothing." The same applies to geodome maintenance.
Seasonal Maintenance Checklists
Implement a rigorous seasonal maintenance schedule. Before winter, inspect the frame for any weaknesses, tighten all bolts, and ensure your anchoring system is robust. Clear surrounding trees of dead branches. Before summer, check for UV degradation on the fabric, clean it thoroughly, and apply any recommended UV protective coatings. Regularly inspect seams for wear and tear. A simple checklist, performed diligently, can catch small issues before they escalate into major damage. According to a Forbes Advisor report on home maintenance, proactive care significantly extends the lifespan of structures and reduces emergency repair costs.
Advanced Anchoring and Ballasting
Many geodome failures stem from inadequate anchoring. Standard ground stakes might suffice for calm weather, but extreme winds demand more. Consider helix anchors, concrete footings, or heavy-duty screw anchors that penetrate deeper into the ground. For domes on platforms, ensure the platform itself is securely anchored, and the dome is bolted directly to it. In exceptionally windy areas, I've even advised clients to use internal water ballasts or sandbags strategically placed around the interior perimeter during anticipated high winds. This added weight significantly increases the dome's resistance to uplift. Always consult with a structural engineer if you're unsure about your current anchoring system's capacity for your specific location's weather patterns.

Case Study: Restoring the 'Whispering Pines' Geodome After a Microburst
The Challenge:
The 'Whispering Pines' glamping site, nestled in a valley known for sudden, intense weather, faced a devastating microburst. One of their flagship geodomes, a 26-foot diameter model, suffered significant damage: a 10-foot rip across two fabric panels, three bent struts near the base, and several loose anchor points. Bookings for the next month were in jeopardy, and the owner, Sarah, was overwhelmed.The Solution (My Intervention):
I worked with Sarah to implement the systematic repair process outlined above. First, we secured the area and meticulously documented all damage for her insurance claim. Next, we focused on the structural integrity. We ordered replacement struts directly from the manufacturer and, while waiting, temporarily braced the weakened sections. Once the new struts arrived, we carefully replaced them, ensuring all connection points were re-tightened to specification. For the fabric, we opted for a 'sandwich' patch approach due to the rip's size. We cleaned the area thoroughly, applied a large internal patch, then an even larger external patch using industrial-grade PVC adhesive and a heat gun for a watertight seal. Finally, we upgraded all anchor points to heavy-duty screw anchors, doubling the number of tie-downs along the dome's perimeter.The Outcome:
Within two weeks, the geodome was not only fully repaired but also significantly more resilient. Sarah was able to resume bookings ahead of schedule, minimizing financial loss. The insurance claim processed smoothly thanks to the detailed documentation. More importantly, Sarah gained invaluable knowledge and confidence in managing her glamping assets, understanding that a systematic approach turns disaster into a manageable challenge. The 'Whispering Pines' dome now stands as a testament to effective repair and proactive maintenance.The Long-Term View: Investment in Durability
Repairing damage is one thing; ensuring it doesn't happen again, or at least minimizing its impact, is another. This requires a long-term perspective and smart investment.
Consider the quality of your geodome materials from the outset. While initial cost savings might be tempting, cheaper fabrics or lighter frames often prove to be false economies in the face of extreme weather. Invest in high-grade PVC or architectural fabrics with robust UV protection and rip-stop features. Opt for galvanized steel or anodized aluminum frames with reinforced connection hubs. Think about the climate you're in: a dome in a hurricane-prone area needs a different specification than one in a mild, temperate zone. Regular maintenance and timely upgrades, such as stronger anchor systems or additional snow load kits, are investments that pay dividends in durability and peace of mind.
| Material Type | Pros | Cons | Best Use Case |
|---|---|---|---|
| Standard PVC Fabric | Cost-effective, good waterproofing | Lower UV resistance, prone to tearing in high winds | Mild climates, temporary setups |
| Architectural Grade PVC/PVDF | Superior UV resistance, high tensile strength, long lifespan | Higher upfront cost, heavier | Extreme weather zones, long-term installations |
| Galvanized Steel Frame | Excellent strength, rust-resistant, high snow/wind load capacity | Heavier, potentially higher shipping costs | All climates, especially high snow/wind areas |
| Anodized Aluminum Frame | Lightweight, corrosion-resistant, good strength-to-weight ratio | Can be more expensive, less compressive strength than steel | Mild-moderate climates, easy transport/assembly |
Frequently Asked Questions (FAQ)
Q: How do I know if my geodome frame is structurally compromised beyond repair? A: If multiple struts are severely bent, twisted, or fractured, or if the connection hubs show widespread cracking or deformation, it's a strong indicator of irreparable structural compromise. While individual struts can be replaced, extensive damage across the frame suggests the entire dome's geometry and load-bearing capacity have been fundamentally altered. In such cases, a professional structural engineer's assessment is crucial, and often, replacement is safer than attempting a patchwork repair.
Q: Can I use standard tarpaulin or duct tape for a temporary repair? A: For a very immediate, short-term emergency to prevent further water ingress, a heavy-duty tarpaulin secured with ropes or strong, wide duct tape can provide a temporary cover. However, this is absolutely not a permanent solution. Standard tarpaulin isn't designed for the stresses on a geodome, and duct tape adhesives degrade quickly with UV exposure and temperature changes. Always transition to a proper, manufacturer-recommended repair using compatible materials as soon as possible.
Q: What's the best way to clean my geodome fabric before applying a patch? A: For PVC or similar fabrics, start by gently scrubbing with mild soap (like dish soap) and warm water to remove surface dirt and grime. Rinse thoroughly. For grease or stubborn residues around the repair area, a small amount of rubbing alcohol or a specialized fabric cleaner (test on an inconspicuous spot first) can be used. Ensure the area is completely dry before applying any adhesive or patch material, as moisture will compromise the bond.
Q: How often should I inspect my geodome for potential extreme weather vulnerabilities? A: I recommend a thorough inspection at least twice a year – once before the onset of your region's most challenging weather season (e.g., late fall for winter, late spring for summer storms) and once after. Additionally, a quick visual check should be performed after any significant weather event. Pay particular attention to anchor points, fabric tension, and any signs of wear or fatigue on seams and the frame.
Q: My geodome is exposed to very high winds. Are there specific reinforcement techniques I should consider? A: Absolutely. Beyond upgrading to heavy-duty screw anchors, consider adding extra guy lines or tensioning straps that run over the dome's exterior and are secured to additional ground anchors. Some high-wind models also feature internal cross-bracing or reinforced connection hubs. If your dome is on a platform, ensure it's bolted down at every possible connection point. Consulting with a local structural engineer familiar with wind loads in your specific area can provide tailored, expert advice for extreme conditions.
Key Takeaways and Final Thoughts
- Safety First: Always prioritize personal safety during initial assessment and repair.
- Document Everything: Comprehensive photos and videos are crucial for insurance and repair planning.
- Understand Damage Types: Different weather impacts require specific repair strategies for fabric and frame.
- Invest in Quality Tools: A dedicated repair kit with appropriate materials is indispensable.
- Be Meticulous: Cleanliness and precise application are key to durable fabric repairs.
- Inspect the Frame: Never overlook the structural integrity of struts and connection points.
- Proactive Prevention: Seasonal maintenance and advanced anchoring save future headaches.
Repairing geodome damage from extreme weather can feel daunting, but it's a challenge that's entirely surmountable with the right approach. By following these expert-backed steps, you're not just fixing a structure; you're reinforcing your investment, ensuring the safety of your guests, and protecting the unique glamping experience you've worked so hard to create. Remember, every challenge is an opportunity to learn and build stronger. Your geodome, and your business, will be more resilient for it.
Recommended Reading
- 7 Pillars: Differentiating Luxury Yurt Glamping in Saturated Markets
- Critically Injured Client: 3-Day Remote Extraction Management Blueprint
- 7 Strategies: How to Address Coral Bleaching & Boost Beach Tourism
- The Secret to Designing Your Dream Bespoke Luxury Glamping Itinerary
- Mastering Access: 7 Strategies for Impossible VIP Client Experiences

Your email address will not be published. Required fields are marked *