
How to Prevent Lead Ice Screw Pull-Outs in Brittle Mixed Ice?
For over two decades navigating the vertical world of frozen waterfalls and mixed terrain, I've witnessed firsthand the terrifying reality of gear failure. There's a particular kind of dread that washes over you when you hear the ominous 'thunk' of an ice screw losing its bite, a sound that signals imminent danger, especially when leading on brittle, mixed ice.
This isn't just about losing a piece of expensive gear; it's about the very real prospect of a catastrophic fall. Brittle ice, often found in thin veneers over rock or in highly fractured conditions, offers a notoriously unreliable medium for protection. The challenge of placing dependable ice screws in such conditions is one of the most significant hurdles for any lead ice climber.
In this definitive guide, I'll share the accumulated wisdom from years of experience, countless pitches, and a few nail-biting moments. We'll delve into actionable strategies, advanced techniques, and a meticulous approach to gear and mindset that will empower you to dramatically enhance the security of your placements and confidently prevent lead ice screw pull-outs in brittle mixed ice.
Understanding the Enemy: The Nature of Brittle Mixed Ice
Before we can master protection, we must first understand the medium we're working with. Brittle mixed ice isn't uniform; it's a dynamic, often deceptive environment that demands acute awareness.
Ice Structure and Weaknesses
Unlike bomber, blue waterfall ice, brittle ice is characterized by a higher air content, microscopic fractures, and often a less crystalline, more granular structure. This makes it prone to shattering under impact or stress.
The internal cohesion of brittle ice is significantly lower, meaning it can't transfer loads as effectively as solid ice. This directly impacts how an ice screw engages and holds.
The Dynamics of Mixed Terrain
Mixed terrain further complicates matters, interspersing ice with rock, often in unpredictable patterns. A screw placed too close to a rock edge, or into an air pocket behind a thin ice sheet, is a recipe for disaster.
The thermal cycling of mixed routes can also exacerbate brittleness, creating layers of refrozen meltwater that are inherently weaker. This constant freeze-thaw makes consistent ice quality a rarity.

The Science of a Secure Placement: Beyond Just Screwing It In
Placing an ice screw effectively in brittle ice is an art refined by science. It's not just about torque; it's about understanding the nuances of engagement.
Angle and Directionality
In brittle ice, a perpendicular placement (90 degrees to the ice surface) is often counterproductive. The initial impact and screwing action can shatter the immediate area around the tube.
Instead, aim for a slightly downward angle, between 80-85 degrees. This angle allows the screw to bite into deeper, potentially more stable ice layers and helps resist upward pull-out forces more effectively.
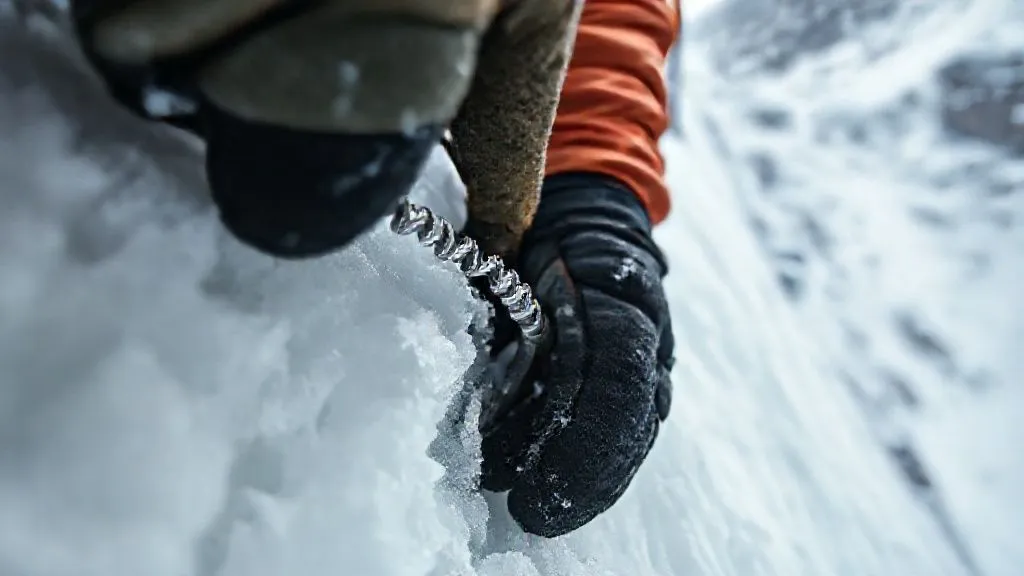
Ice Quality Assessment (Visual Cues, Tapping)
Always tap the ice before placing a screw. A solid 'thunk' indicates denser ice, while a hollow 'clink' or 'crunch' suggests brittleness, air pockets, or a thin veneer. Visually inspect for clarity, fractures, and delamination.
Look for areas where the ice might be thicker, perhaps in a bulge or a corner where it's supported by rock. Avoid obvious cracks, seams, or areas where the ice appears 'rotten' or slushy.
| Ice Quality | Holding Power | Placement Strategy |
|---|---|---|
| Clear, Blue, Dense | Excellent | Perpendicular or slight downward angle, standard technique |
| White, Aerated, Frosted | Good to Moderate | Slight downward angle (80-85°), avoid shattering, longer screws |
| Fractured, Layered, Mixed | Moderate to Poor | Shallow angle (70-75°), seek rock backing, multi-directional, reinforce |
| Rotten, Slushy, Delaminated | Very Poor | Avoid at all costs, seek alternative protection or retreat |
- Identify Potential Zones: Scan for thicker, less fractured ice, usually in depressions or behind bulges.
- Tap and Listen: Use your axe or a knuckle to audibly assess density and structural integrity.
- Initial Bite: Start the screw carefully, applying gentle pressure. If it shatters immediately, relocate.
- Maintain Angle: Aim for that 80-85 degree downward angle, ensuring the threads engage smoothly.
- Full Engagement: Screw until the hanger is flush with the ice, ensuring all threads are buried.
- Test (Subtly): Give a gentle, firm tug on the screw. If it feels solid, proceed.
Gear Matters: Selecting the Right Tools for the Job
Your choice of ice screw significantly impacts its performance in brittle conditions. Not all screws are created equal.
Screw Length and Diameter
In brittle ice, longer screws (19-22cm) are often preferable as they can reach deeper, potentially more stable ice layers. However, a longer screw also requires more intact ice to fully engage, which can be a paradox.
Shorter screws (13-16cm) might be useful in very thin, hard ice veneers over rock, acting more like a rock piton, but their holding power is drastically reduced. A mix of lengths is always wise.
Sharpening and Maintenance
A dull screw is a dangerous screw, especially in brittle ice. Sharp teeth cut cleanly, minimizing shattering. Dull teeth tear and crush, creating a weaker placement.
Regularly inspect and sharpen your screws, paying particular attention to the lead teeth and the cutting angles. A perfectly sharpened screw will start easily and screw in smoothly, leaving a clean core.
"A sharp ice screw in brittle ice isn't a luxury; it's a non-negotiable safety imperative. It allows for a surgical placement rather than a destructive one."
For detailed guidance on screw maintenance, I highly recommend consulting resources from reputable manufacturers. Petzl's technical advice on ice screw maintenance offers excellent insights into keeping your gear in top condition.
Advanced Techniques for Challenging Ice
When the ice is truly marginal, relying solely on a single ice screw is a gamble. This is where advanced techniques come into play.
V-Threads and Abalakov Anchors (When and How to Reinforce)
V-threads, or Abalakov anchors, can be surprisingly strong in brittle ice if constructed correctly. The key is to ensure the two holes converge perfectly and that the ice around the thread is as solid as possible.
In brittle ice, consider creating a 'double V-thread' with two independent threads, or reinforcing a single thread with a well-placed screw below it, distributing the load and adding redundancy.
Integrating Rock Protection (Nuts, Cams) in Mixed Terrain
This is where the 'mixed' aspect of mixed climbing truly shines. Whenever possible, integrate rock protection into your anchor systems. A small nut or cam in a nearby crack can drastically increase the overall strength of a marginal ice screw placement.
Think multi-directional. If a screw is placed in questionable ice, a piece of rock gear preventing an upward pull, or a sideways pull, can be the difference between a secure anchor and a catastrophic failure.
- Combine Strengths: Always seek to combine ice screws with camming devices or nuts in cracks.
- Directional Reinforcement: Use rock gear to counteract specific vectors of pull on an ice screw.
- Equalize Smartly: Build multi-point anchors that equalize loads between ice and rock protection.
- Prioritize Rock: If a bomber rock placement is available, often it's superior to a marginal ice screw.
Case Study: The Ghost of the Black Dike
I recall a harrowing lead on a remote mixed route, 'The Ghost of the Black Dike,' where the ice was a mere veneer over rotten granite. My partner, Alex, was leading a steep section. He struggled to get a solid screw in a thin, fractured sheet of ice. After several attempts, he managed to get a 16cm screw about two-thirds in, but it felt 'squirrely.'
Instead of pushing on, he wisely down-climbed a meter to a small horizontal crack. He placed a small offset nut, then tied off the marginal ice screw with a sling to the nut, creating a two-point anchor that was far stronger and more directional than either piece alone. This combination of a marginal ice screw and a bomber rock piece not only held a subsequent small slip but also provided the confidence to continue the pitch. It exemplified how to prevent lead ice screw pull-outs in brittle mixed ice by thinking beyond just ice.
For further reading on advanced protection strategies in mixed terrain, the American Alpine Club's safety research and publications offer invaluable insights from real-world incidents and expert analysis.
The Art of the Lead: Mindset and Movement
Your climbing technique and mental approach are as crucial as your gear and placement skills when facing brittle ice.
Minimizing Rope Drag and Shock Loading
Excessive rope drag can exert insidious forces on your protection, especially on traverses or wandering routes. Every time you pull rope to clip, you're potentially tugging on your last piece of gear.
Use long slings (extendable draws) to minimize drag and ensure your rope runs smoothly. Climb with precision, avoiding sudden movements or slips that could shock load a marginal screw. A smooth, controlled fall is always preferable to a sudden, jerking one.
Strategic Clipping and Stance
Before you even think about placing a screw, consider your stance. A stable, comfortable stance allows for a more deliberate and effective placement. If you're teetering precariously, your placement will likely reflect that instability.
Think ahead: Where is the next good stance? Where is the best potential protection? Don't rush. Take the time to assess, clean the ice if necessary, and place the screw with confidence.

Reinforcement and Redundancy: Building Unbreakable Systems
In brittle ice, redundancy isn't just a good idea; it's a fundamental principle of survival. Never trust a single piece of protection if you have any doubt about its integrity.
Equalization Principles (SERENE, ERNEST)
When building multi-point anchors in brittle ice, proper equalization is paramount. The SERENE principles (Symmetrical, Equalized, Redundant, No Extension, Efficient) and ERNEST (Equalized, Redundant, No Extension, Strong, Timely) are your guiding stars.
Ensure that if one piece fails, the load is smoothly transferred to the remaining pieces without shock loading. This often means using a sliding X or a quad anchor system, even for intermediate placements.
Multi-Point Anchors in Brittle Ice
For belay anchors in brittle ice, I advocate for at least three, ideally four, points of protection. These could be a combination of screws, V-threads, and rock gear. The more points, the more the load is distributed, and the less critical the failure of any single piece becomes.
Consider using two screws in a 'V' formation, spaced about 12-18 inches apart, equalized. This provides a wider base of support and reduces the chance of both screws failing simultaneously from a localized ice fracture. Always back up V-threads with a screw if possible.
The UIAA Safety Standards provide comprehensive guidelines for climbing equipment and techniques, offering a global benchmark for safe practices in various climbing environments, including ice.
Training and Practice: Honing Your Ice Instincts
The best way to prevent pull-outs isn't just theoretical knowledge; it's hands-on experience and deliberate practice.
Dry Tooling for Mixed Terrain
Dry tooling, or climbing rock with ice tools and crampons, is an excellent way to develop the specific strength, technique, and mental fortitude required for mixed climbing. It teaches you how to move efficiently and precisely, minimizing unnecessary strain on protection.
Practicing tool placements on rock also hones your ability to find subtle features and make precise strikes, skills directly transferable to finding good ice and placing screws effectively.
Mock Placements and Scenario Drills
Practice placing ice screws in a controlled environment. On a low-angle slope, practice placing screws with your non-dominant hand, or in awkward positions. Simulate challenging scenarios: thin ice, fractured ice, ice near rock.
These drills build muscle memory and confidence, so when you're on lead, high off the ground, facing truly brittle ice, the actions become instinctual. It's about developing an intuitive feel for what a good placement 'feels' like.
Frequently Asked Questions (FAQ)
Can a shorter screw ever be better than a longer one in brittle ice? Yes, in very specific scenarios. If the brittle ice is a thin veneer over solid rock, a shorter screw (10-13cm) might be more effective as it can bottom out on the rock, acting somewhat like a piton. A longer screw in this situation might just spin in the air behind the thin ice. However, the holding power is still limited, and such placements should always be reinforced.
How do I know if the ice is too brittle for screws? Beyond visual inspection for cracks and aeration, the 'tap test' is crucial. If tapping with your axe produces a dull, hollow thud or the ice shatters easily, it's likely too brittle. You'll also feel it when trying to start the screw – if it immediately crumbles or refuses to bite cleanly, consider it a red flag. Look for alternatives or retreat.
What's the biggest mistake climbers make with ice screws in mixed terrain? The most common mistake is underestimating the variability of ice quality and over-relying on a single screw in marginal conditions. Climbers often fail to integrate rock protection, equalize multiple points, or take the time for a meticulous placement, leading to complacency that brittle ice will punish severely.
Is it worth carrying specialized 'brittle ice' screws? While there aren't specific 'brittle ice' screws, some designs with aggressive teeth and wider threads might perform marginally better. However, the most significant 'specialization' comes from carrying a varied rack of lengths and ensuring all your screws are meticulously sharpened. Your technique and assessment skills are far more critical than any 'specialized' screw.
How often should I inspect and sharpen my screws? Inspect your screws before and after every outing, and certainly after any fall or heavy use. Sharpen them as soon as you notice any dullness or damage to the lead teeth. A good rule of thumb is to sharpen them proactively at least once or twice during a busy season, or after every 5-10 pitches of leading on ice, depending on ice quality.
Key Takeaways and Final Thoughts
Preventing lead ice screw pull-outs in brittle mixed ice is a multifaceted challenge, demanding a blend of technical skill, astute judgment, and unwavering vigilance. It's about understanding the medium, mastering your tools, and refining your technique.
- Assess Rigorously: Always evaluate ice quality meticulously through visual cues and the 'tap test.'
- Angle for Success: Opt for a slightly downward angle (80-85 degrees) for optimal bite in brittle ice.
- Sharpen Relentlessly: Maintain razor-sharp screws; they are your primary interface with the ice.
- Embrace Redundancy: Never trust a single marginal piece; build multi-point, equalized anchors.
- Integrate Rock: Use rock protection whenever available to bolster ice placements in mixed terrain.
- Climb Deliberately: Minimize rope drag and move smoothly to avoid shock loading.
- Practice Consistently: Hone your skills through mock placements and dry tooling to build instinct.
The mountains, especially in their frozen state, are unforgiving teachers. By internalizing these strategies and committing to continuous learning and practice, you'll not only enhance your safety but also elevate your confidence and enjoyment in the magnificent, yet demanding, world of ice and mixed climbing. Climb smart, climb safe, and may your screws always hold firm.
Recommended Reading
- 7 Pro Strategies: How to Minimize Hidden Charges on Luxury Cruises
- 7 Steps to Vet Accessible Tour Operators for Authentic Disabled Needs
- The Ultimate Secret: How to Pick a Beach with Crystal Clear Water Every Time
- 7 Pillars: Sustainable Returns from Biodiversity Eco-Tourism?
- Ultimate Guide: How to Ensure Child Safety on International Family Tours

Your email address will not be published. Required fields are marked *