
How to Stay Safe During River Crossings on Adventure Treks
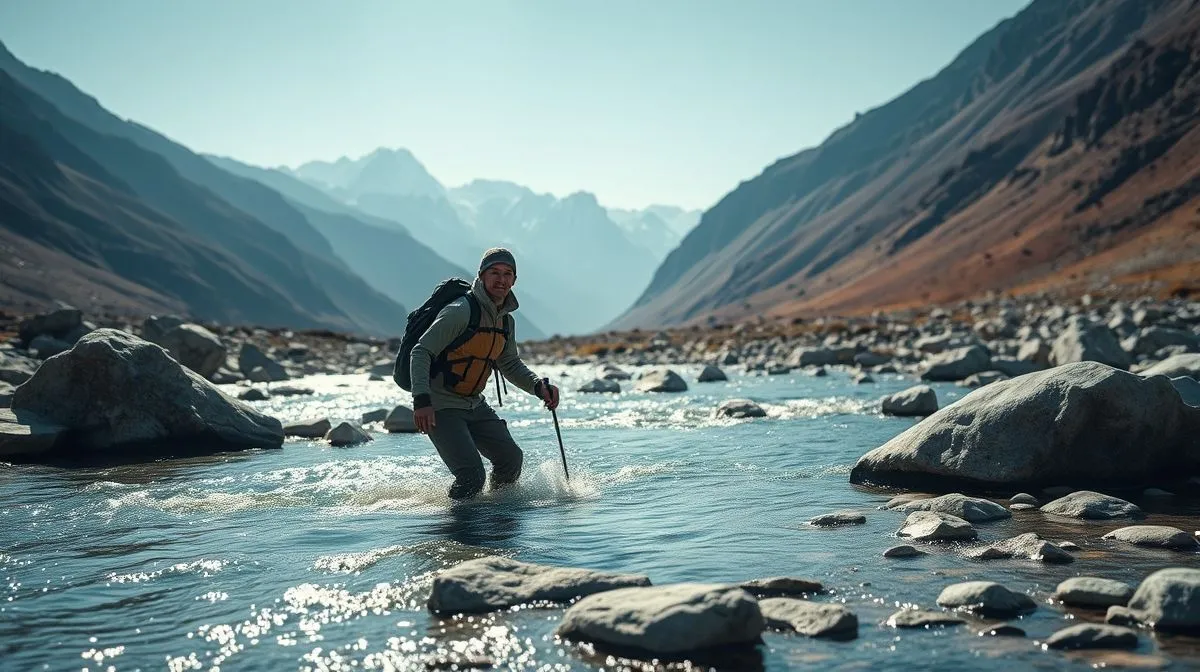
Imagine standing at the edge of a rushing river, its icy waters a formidable barrier on your adventure trek. The path ahead beckons, but crossing seems daunting, perhaps even perilous. This moment of hesitation is a common experience for even seasoned outdoor enthusiasts, highlighting the inherent challenge and potential danger of water crossings in the wilderness.
River crossings are often an unavoidable part of wilderness adventures, presenting unique challenges and potential dangers that range from a simple slip to being swept away by strong currents. Misjudging conditions, lacking proper technique, or failing to prepare adequately can quickly turn a thrilling journey into a life-threatening situation. It's not just about getting to the other side; it's about doing so with utmost safety and confidence.
This comprehensive guide will equip you with the knowledge and skills necessary on how to stay safe during river crossings on adventure treks, transforming a potential hazard into a manageable and even enjoyable part of your expedition. You'll learn about critical assessment, essential gear, proven techniques, and vital safety protocols to navigate water confidently and securely, ensuring your adventure remains epic for all the right reasons.
Understanding the Dynamics of River Crossings
Before you even consider stepping into the water, a thorough understanding of river dynamics is paramount. Rivers are living entities, constantly changing due to weather, time of day, and upstream conditions. What might seem like a calm stream one moment could become a raging torrent hours later, especially during or after heavy rainfall or snowmelt.
Assessing River Conditions
The first and most critical step is a comprehensive assessment of the river. This involves more than just a quick glance; it requires careful observation and consideration of several key factors. Your ability to accurately read the water will often dictate whether a crossing is safe, or if an alternative route or a wait is necessary.
- Current Speed: Observe how quickly the water is moving. Look for standing waves, which indicate powerful currents. If the current is strong enough to move large rocks or debris, it's likely too strong for a safe crossing.
- Depth: Try to estimate the depth. Look for visual cues like submerged rocks or changes in water color. If you can't see the bottom, or if the water appears to be above your knees, exercise extreme caution. Generally, water above mid-thigh height is considered very dangerous for unassisted crossings.
- Width: A wider river might seem less intimidating, but it can mean a longer exposure to cold water and current. A narrow, fast-moving channel can be deceptively powerful.
- Bottom Composition: Is the riverbed rocky, sandy, or silty? A stable, firm bottom provides good footing, while slippery rocks or deep mud can increase the risk of falls.
- Upstream Hazards: Look upstream for potential dangers like waterfalls, rapids, logjams, or narrow gorges. If you were to fall, where would you end up? Ensure there's a clear, safe 'run-out' zone downstream.
- Downstream Recovery: Identify potential recovery points downstream in case someone is swept away. This includes eddies, calm pools, or accessible banks.
Factors Influencing Safety
Beyond the river itself, several external factors contribute to the overall safety of a crossing. These elements are often overlooked but can significantly increase or decrease the risk involved. A holistic view of the situation is crucial for sound decision-making.
- Weather Conditions: Recent rainfall can drastically increase river levels and current speeds. Melting snowpack in spring and early summer also contributes to higher, colder water.
- Air and Water Temperature: Cold water saps body heat quickly, leading to hypothermia. Even on a warm day, glacial meltwater can be dangerously cold. According to the CDC's guidelines on hypothermia, even mildly cold water can be dangerous over time.
- Group Size and Experience: A larger, experienced group might attempt crossings that a solo or novice trekker would avoid. Always consider the weakest swimmer or least experienced member of your group.
- Time of Day: Rivers often rise in the afternoon due to increased snowmelt from daytime warming. Morning crossings, when water levels are typically lower, are often safer.
- Alternative Routes: Before committing to a crossing, always scout for alternative routes, bridges, or safer crossing points upstream or downstream. Sometimes, a longer detour is the safest option.
Essential Gear and Preparation for Safe Water Fording
Proper gear and meticulous preparation can make the difference between a successful, safe crossing and a perilous ordeal. Never underestimate the importance of having the right equipment and knowing how to use it effectively.
Footwear and Clothing Choices
Your choice of footwear is paramount. While it might seem counterintuitive, never cross barefoot or in open-toed sandals where you risk injury from submerged objects. Instead, opt for sturdy, close-toed footwear that offers good grip and protection.
- River Shoes: Old sneakers, water shoes, or even lightweight hiking boots that you don't mind getting wet are ideal. They provide protection from sharp rocks and offer stability.
- Socks: Wear wool or synthetic socks, even if they get wet, to provide insulation and prevent blisters. Avoid cotton, which offers no insulation when wet and takes a long time to dry.
- Clothing: Wear quick-drying synthetic or wool clothing. Avoid heavy cotton or denim. Consider taking off your outer layers before crossing to minimize drag if you were to fall.
Trekking Poles: Your Best Friends
Trekking poles are not just for stability on trails; they are indispensable for river crossings. They provide two additional points of contact with the riverbed, significantly enhancing your balance and stability.
- Stability: Use them to create a stable tripod with your two feet, distributing your weight and providing crucial balance against the current.
- Probing: Use the poles to probe the riverbed ahead of you, checking for depth, slippery rocks, and hidden holes before you commit your weight.
- Support: They can act as a brace, allowing you to lean into the current and maintain your upright posture.
Protecting Your Valuables
Water can infiltrate even seemingly waterproof bags. Take extra precautions to protect your electronics, sleeping bag, and other critical items.
- Dry Bags: Use multiple layers of dry bags for essential items. Even if your pack has a rain cover, it's not sufficient for a river crossing.
- Pack Liner: A large, heavy-duty trash compactor bag used as a pack liner provides an excellent first line of defense.
- Loose Items: Secure all loose straps and items on your pack to prevent them from snagging on debris or creating drag in the current. Loosen your hip belt and sternum strap so you can quickly shed your pack if you fall.
Mastering Solo River Crossing Techniques
Crossing a river alone requires an even higher degree of caution and skill. Without the support of a group, your personal technique and judgment are your only safeguards. Always consider the inherent risks before attempting a solo crossing.
The Tripod Method
This is the most fundamental and effective solo technique. It emphasizes maintaining three points of contact with the riverbed at all times, providing maximum stability against the current.
- Face Upstream: Always face slightly upstream and diagonally across the river. This allows you to see the current and any debris coming your way, and the current's pressure helps to brace you.
- Wide Stance: Keep your feet wide apart, about shoulder-width, to increase your base of support.
- Probe and Step: Use one trekking pole to probe the riverbed ahead. Once you've found a stable spot, move one foot to that spot. Then, use the other pole to probe for the next step, always maintaining two feet and one pole, or one foot and two poles, on the ground.
- Shuffle, Don't Lift: Instead of lifting your feet high, shuffle them across the bottom. This minimizes the chance of losing balance if a foot slips.
- Lean into the Current: Lean slightly into the current, allowing the water's force to help brace you rather than push you over.
Facing Upstream: Why It Matters
The recommendation to face upstream is not arbitrary; it's a critical safety measure. When you face upstream, you present a smaller profile to the current, reducing the force acting on your body. More importantly, it allows you to see any obstacles or debris (like logs or branches) floating downstream, giving you time to react and avoid them. If you were to face downstream, you'd be pushed from behind, unable to see what's coming, and more prone to losing balance.
When Not to Cross Alone
There are definite situations where a solo river crossing should be absolutely avoided, regardless of your experience. Your life is not worth the risk.
- Swiftwater: If the current is strong enough to make standing difficult, or if you see standing waves, do not cross alone.
- Deep Water: If the water is above your mid-thigh, the risk of being swept off your feet dramatically increases.
- Unknown Conditions: If you cannot clearly see the riverbed or assess downstream hazards.
- Lack of Experience: If you are new to river crossings or feel uncertain about your abilities.
- Injury or Fatigue: If you are injured, exhausted, or not feeling 100%, your judgment and physical strength will be compromised.
Group Strategies for Safer River Crossings
When trekking with a group, you have a significant advantage: collective strength and support. Group crossing techniques leverage this advantage to create a much more stable and safe passage than solo attempts. These methods distribute the force of the current and provide mutual support.
The Buddy System and Link-Up Method
The simplest group strategy involves two or more people linking arms or holding onto each other's packs. This creates a larger, more stable unit that is harder for the current to push over.
- Buddy System (Two People): Two trekkers stand side-by-side, linking arms or holding onto each other's pack straps. They move in unison, shuffling across the river. The stronger person should be slightly upstream to break the current.
- Link-Up (Three or More People): For larger groups, form a line or a V-shape, linking arms or holding pack straps. The strongest person should be at the upstream end of the line, acting as an anchor and breaking the current for the others. The group moves together, shuffling their feet in unison. The V-shape, with the point facing upstream, is particularly effective at distributing the current's force.
Rope-Assisted Crossings
In more challenging situations, a rope can be used to provide an additional layer of safety, especially if you have experience with rope work and anchor systems. This is a more advanced technique and should only be attempted by those with proper training.
- Scouting: Identify strong anchor points on both sides of the river (e.g., large trees, boulders).
- First Person Across: The strongest swimmer or most experienced person, wearing a PFD (personal flotation device) if available, can attempt to cross first with a rope, establishing a tensioned line. They should be tethered to a safety line held by the group on the bank.
- Handline: Once the first person is across and the rope is securely anchored on both sides, it can be tensioned to create a handline. Trekkers then cross one by one, holding onto the rope for stability.
- Belay: For very challenging crossings, a belay system can be set up, where each person is clipped into the rope and belayed across, providing a strong safety backup. This requires specific training and equipment.
Communication is Key
Regardless of the method, clear and constant communication within the group is vital. Before entering the water, discuss the plan, assign roles, and establish clear signals for 'stop,' 'go,' or 'trouble.' Once in the water, members should continuously communicate about footing, current changes, and any issues. A single person's slip can affect the entire group, so vigilance is required from everyone.
Dealing with Swiftwater: Advanced Considerations
Swiftwater presents unique and severe dangers. The force of moving water is exponentially powerful, and even seemingly shallow swiftwater can be deadly. It's crucial to recognize when water is too swift to cross and to know what to do if you or a group member ends up in it.
Identifying Swiftwater Hazards
Water moving at just a few miles per hour can generate immense pressure. Understanding the specific hazards of swiftwater is essential for survival.
- Hydraulics (Holes): These are powerful recirculating currents formed by water flowing over an obstacle (like a submerged rock or ledge), creating a 'hole' or 'stopper' that can trap and drown a person.
- Strainers: Obstacles like fallen trees, logjams, or debris that allow water to pass through but trap solid objects (like people). Being pinned against a strainer by the current is extremely dangerous.
- Undercuts: Sections of riverbank or rock where the water flows underneath, creating a void. If swept into an undercut, it's nearly impossible to get out.
- Cold Shock: Sudden immersion in cold water can cause an involuntary gasp, hyperventilation, and disorientation, increasing the risk of drowning.
- Foot Entrapment: Your foot can get wedged between rocks on the riverbed. The current then pushes your body downstream, potentially forcing you underwater.
Self-Rescue Techniques
If you fall into swiftwater, panic is your worst enemy. Knowing basic self-rescue techniques can significantly increase your chances of survival. According to Wikipedia's Swiftwater rescue guide, specific body positions and actions are critical.
- Feet First, On Your Back: If swept away, immediately roll onto your back with your feet pointed downstream. Keep your feet up and near the surface to fend off rocks and avoid foot entrapment.
- Paddle with Arms: Use your arms to steer towards an eddy or a calmer section of the river.
- Swim Aggressively: If you're close to shore or a safe eddy, swim aggressively towards it. If you're in the middle of a continuous current, conserve energy and focus on staying afloat and avoiding obstacles.
- Don't Stand Up: Never try to stand up in swiftwater unless it's extremely shallow and you can clearly see the bottom. The risk of foot entrapment is too high.
- Release Your Pack: If you feel your pack is hindering your ability to stay afloat or is snagging, immediately release the hip belt and sternum strap and shed it. Your life is more valuable than your gear.
When to Turn Back
The most important swiftwater safety rule is knowing when to retreat. If there's any doubt about the safety of a crossing, the answer is always NO. No trek is worth risking your life. Be prepared to:
- Wait It Out: If conditions are temporary (e.g., heavy rain that will pass), wait for the water levels to recede.
- Find an Alternative Route: Scout extensively for bridges, narrower sections, or calmer areas upstream or downstream.
- Turn Around: If no safe option presents itself, accept that the river is impassable and turn back. This is a sign of good judgment, not failure.
Post-Crossing Procedures and Common Mistakes to Avoid
Successfully navigating a river crossing isn't just about getting to the other side; it also involves crucial post-crossing procedures and avoiding common pitfalls that can compromise your safety and comfort.
Re-establishing Warmth and Dryness
Once you've safely crossed, your body temperature will likely have dropped, especially if the water was cold. Addressing this quickly is vital to prevent hypothermia.
- Change into Dry Clothes: Immediately change out of your wet clothes into dry, warm layers. Even if the air temperature seems mild, the evaporative cooling from wet clothing will rapidly draw heat from your body.
- Warm Up: Put on a warm hat, gloves, and a puffy jacket. Consume warm liquids or high-energy snacks to help your body generate heat.
- Keep Moving: Light activity, like walking, can help generate body heat. Avoid sitting still for long periods until you are thoroughly warmed up.
Checking for Injuries and Gear Damage
A quick post-crossing check can identify potential problems before they escalate.
- Check Yourself: Inspect your feet and legs for cuts, scrapes, or blisters, especially if you had uncertain footing.
- Check Your Gear: Ensure all your dry bags are still sealed and that no water has seeped into your pack. Check for any damage to your trekking poles or other equipment.
Mistakes to Avoid
Even experienced trekkers can make mistakes during river crossings. Being aware of these common errors can help you avoid them.
- Crossing Barefoot: As mentioned, this exposes your feet to sharp objects and unstable footing.
- Not Loosening Pack Straps: Failing to loosen your hip belt and sternum strap can trap you if you fall, making it impossible to shed your pack.
- Crossing Alone When Unsure: Always err on the side of caution. If you have any doubt, wait for a group or find an alternative.
- Not Scouting: Rushing into a crossing without thoroughly assessing conditions is a recipe for disaster.
- Looking Down at Your Feet: While you need to be aware of your footing, constantly looking down can disorient you and make you lose balance. Look slightly ahead and across.
- Failing to Protect Electronics: Water and electronics don't mix. Assume nothing is truly waterproof without proper dry bag protection.
- Underestimating the Current: Even seemingly gentle currents can be deceptively powerful, especially if the water is deep. The force of water increases exponentially with speed.
Environmental Responsibility and Leave No Trace
As adventurers, we have a responsibility to protect the wild places we explore. River crossings, like all aspects of trekking, should be conducted with a strong commitment to Leave No Trace principles. This ensures that the natural beauty and ecological integrity of waterways are preserved for future generations.
Minimizing Impact on Waterways
Your actions during a river crossing can affect the delicate aquatic ecosystems. Practicing responsible crossing techniques helps minimize your footprint.
- Cross at Durable Surfaces: Choose crossing points with rocky or sandy bottoms, avoiding sensitive vegetation or muddy banks that can be eroded.
- Spread Out: If crossing with a group, avoid walking single file through shallow areas, which can create a concentrated impact. Spread out slightly to disperse your weight.
- Avoid Contamination: Ensure no soap, food scraps, or other contaminants enter the water. If you need to relieve yourself, do so at least 200 feet away from water sources.
- Clean Footwear: Before entering a new watershed, clean your footwear to prevent the spread of invasive species.
Respecting Wildlife and Ecosystems
Rivers are vital habitats for countless species. Your presence can disturb them if not managed carefully.
- Observe from a Distance: If you encounter wildlife near a crossing point, give them ample space. Do not disturb nesting birds, spawning fish, or other animals.
- Stay on Established Paths: Where possible, use existing trails leading to and from crossing points to avoid trampling vegetation.
- Pack It In, Pack It Out: Ensure all trash, including micro-trash, is carried out. This includes any gear that might break or be lost during a crossing.
By adhering to these principles, you contribute to the conservation of the natural environment, ensuring that the wild rivers and landscapes remain pristine for everyone to enjoy responsibly.
Frequently Asked Questions (FAQ)
What is the safest depth for a river crossing? Generally, water no deeper than your mid-thigh is considered safe for unassisted crossings. Any deeper, and the risk of losing balance and being swept away increases significantly.
Should I wear my boots or take them off for a river crossing? Always wear sturdy, closed-toe footwear (like old sneakers or water shoes) for river crossings. Going barefoot risks injury from submerged objects, and taking off your main hiking boots can be impractical for deep or long crossings.
What if I fall during a river crossing? If you fall, immediately roll onto your back with your feet pointed downstream. Keep your feet up to fend off rocks and avoid foot entrapment. Swim aggressively towards an eddy or the nearest bank, and be prepared to shed your pack if it impedes your ability to stay afloat.
How do I know if the current is too strong? Look for standing waves, which indicate powerful currents. If the water is moving fast enough to make standing difficult or to move large rocks, it's likely too strong. When in doubt, do not cross.
Is it safer to cross a river alone or in a group? Crossing in a group is generally safer, as you can use techniques like the buddy system or link-up method to provide mutual support and stability against the current. Solo crossings require a higher degree of caution and skill.
Recommended Reading
- Dog Sledding Gear: Conquer Sub-Zero Temps Like a Pro!
- Master Your First White Water Rafting Trip: Essential Prep Guide
- Best Baking Classes While Traveling Abroad: A Delicious Journey
- Volunteer for Sea Turtles: Your Ultimate Guide to Conservation
- Glamping in the Cold: The Ultimate Packing List for Winter
Conclusion
Navigating river crossings on adventure treks is an inherent part of wilderness exploration, presenting both exhilarating challenges and significant risks. By diligently assessing conditions, preparing with the right gear, mastering proven techniques for both solo and group crossings, and understanding the dangers of swiftwater, you can transform these formidable obstacles into manageable and even rewarding experiences. Remember, the ultimate decision to cross always rests on your judgment and an unwavering commitment to safety. Prioritizing your well-being and respecting the power of nature will ensure that your adventures remain memorable for all the right reasons. Always err on the side of caution, and never hesitate to turn back if conditions are beyond your comfort or skill level, ensuring you know how to stay safe during river crossings on adventure treks.

Your email address will not be published. Required fields are marked *