
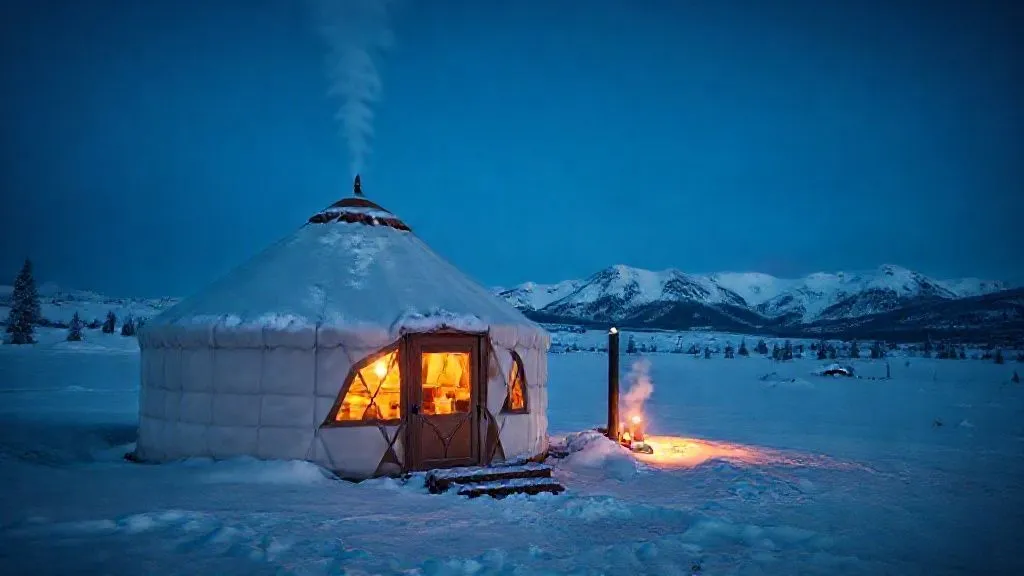
Winterizing Glamping Yurts for Year-Round Sub-Zero Operation
For over 15 years in the glamping industry, I've witnessed countless operators underestimate the formidable challenge of extreme winter conditions. They invest in beautiful yurts, market unique experiences, but often overlook the critical engineering and operational adjustments required to truly thrive when temperatures plummet well below freezing. The result? Lost revenue, frustrated guests, and ultimately, a shortened operational season that severely impacts profitability.
The problem isn't just about keeping warm; it's a complex interplay of insulation, heating, ventilation, structural integrity, and guest management. Sub-zero temperatures expose every weakness, leading to uncomfortable interiors, persistent condensation issues, frozen pipes, and even structural damage from heavy snow loads. Guests seeking a magical winter escape are quickly disillusioned by drafts, dampness, and an inability to truly relax.
This definitive guide is born from years of hands-on experience and extensive research into cold-weather glamping. I’m going to walk you through an actionable, expert-backed framework for
The Foundation: Ground-Up Thermal Fortification
In my experience, the ground is often the most overlooked component in a yurt's thermal envelope. Heat doesn't just rise; it radiates in all directions, and significant losses can occur through an uninsulated or poorly insulated floor. Addressing this first is non-negotiable for true year-round sub-zero comfort.
Insulating the Base and Floor System
Your yurt's platform is its first line of defense against the cold earth. Without proper insulation, the ground will act as a massive heat sink, drawing warmth directly out of your living space. This isn't just about comfort; it's about heating efficiency and protecting your investment.
- Elevated Foundation: Start with a robust, elevated platform. This creates an air gap between the ground and your floor, which is crucial. Aim for at least 18-24 inches of clearance to allow for proper airflow and access.
- Perimeter Skirting and Air Sealing: Enclose the perimeter of your platform with insulated skirting. This prevents cold air from circulating directly beneath the floor. Use materials like plywood backed with rigid foam insulation, ensuring all gaps and seams are meticulously sealed with expanding foam or high-quality caulk.
- Subfloor Insulation: Install rigid foam insulation (e.g., XPS or EPS) between the floor joists. The thicker the better in sub-zero climates; I recommend at least 4-6 inches. Ensure a tight fit to prevent thermal bridging.
- Vapor Barrier: Place a continuous vapor barrier (6-mil polyethylene sheeting) above the insulation and directly beneath your finished flooring. This is critical to prevent ground moisture from migrating into your yurt and causing condensation or mold issues.
- Finished Flooring: Opt for thermally massive flooring materials like engineered wood or thick vinyl, avoiding cold-conducting options like tile directly over concrete.
By following these steps, you create a thermal break that dramatically reduces heat loss through the floor, making your heating system far more effective and your yurt significantly cozier.

Elevating for Snow Load and Drainage
Beyond insulation, the height of your platform plays a crucial role in heavy snow environments. A higher platform helps prevent snow from piling up against the yurt walls, which can lead to moisture wicking and increased heat loss. It also ensures proper drainage away from the structure, preventing ice damming around the base.
Consider the average snow depth in your region and add at least another foot for safety and operational ease. A higher platform also makes it easier to install and maintain skirting and access underfloor plumbing if needed.
The Envelope: Multi-Layered Wall and Roof Protection
Once the foundation is secure, the next critical step is fortifying the yurt's fabric envelope. Traditional yurt walls and roofs, while robust, are often not designed for sustained sub-zero temperatures without significant enhancement.
Optimizing Wall Insulation for Extreme Cold
The standard yurt wall consists of a lattice frame covered by an outer fabric. To achieve sub-zero readiness, you need to introduce multiple layers of insulation and air gaps.
- Inner Liner: Start with an attractive, breathable inner liner. This provides a finished look and helps create an initial air pocket.
- Reflective Insulation: Next, install a layer of reflective foil insulation with an air gap on both sides. This is excellent for radiant heat reflection.
- Felt or Wool Insulation: A thick layer (e.g., 1/2 inch to 1 inch) of natural felt or recycled wool insulation is highly effective for thermal mass and sound dampening. It also manages moisture well.
- Outer Cover: The yurt's primary canvas or PVC outer cover. Ensure it's heavy-duty, UV-treated, and waterproof.
- Air Gaps: The key is to create air gaps between these layers. Air is an excellent insulator when trapped. Strategic battens or spacers can help maintain these gaps.
I've seen operators try to cut corners here, using only a single layer of thin insulation. In sub-zero conditions, this is simply inadequate. Think of it as dressing for winter: multiple, breathable layers are always more effective than one thick one.
Reinforcing the Roof and Dome for Snow Resilience
The yurt roof and dome are particularly vulnerable to heavy snow loads and heat loss. Snow accumulation can exert immense pressure, potentially compromising the structural integrity of the compression ring and rafters.
Structural Upgrades:
- Additional Rafters: Consider adding extra rafters to distribute the load more effectively. Consult with your yurt manufacturer or a structural engineer.
- Reinforced Compression Ring: The compression ring is the keystone of the yurt's structure. Ensure it's robust and can withstand increased downward pressure.
- Snow Load Anchoring: In areas with extreme snowfall, consider external anchoring systems or guy wires to prevent uplift or collapse.
Roof Insulation:
- Insulated Roof Cap: Many yurt manufacturers offer insulated roof caps. This is a must-have.
- Dome Insulation: The clear dome, while beautiful for stargazing, is a major heat loss point. Consider a removable, insulated cover for it during extreme cold. Some innovative solutions involve double-pane acrylic domes or even smart glass that changes opacity.

Heating Systems: Efficiency and Safety in the Extreme
Selecting and managing your heating system is paramount for year-round sub-zero operation. It's not just about warmth; it's about safety, efficiency, and consistent comfort.
Choosing the Right Primary Heating Source
Each heating option has its pros and cons in a sub-zero environment. The best choice depends on your budget, access to utilities, and desired guest experience.
- Wood Stoves: Offer a rustic charm and provide intense, dry heat. They require regular tending, fuel storage, and meticulous safety protocols (carbon monoxide detectors, proper venting, heat shields). Ideal for off-grid locations.
- Propane Heaters: Convenient and powerful. They can be thermostatically controlled, offering consistent warmth. Ensure proper ventilation to prevent CO buildup and manage propane tank refills. Direct-vent models are safest.
- Electric Heaters: Easiest to install and maintain if you have reliable grid power. Radiant electric panels or baseboard heaters are good options. However, they can be expensive to run in large spaces and extreme cold.
In my experience, a combination approach often yields the best results. A primary heating source for ambient warmth, supplemented by targeted heating.
Implementing Supplemental and Zoned Heating
Even with a good primary heater, some areas might remain cooler, or guests might desire more control. Supplemental heating can bridge this gap.
- Radiant Floor Heating: While a significant upfront investment, radiant electric or hydronic floor heating provides incredibly comfortable, even warmth from the ground up. It’s a game-changer for sub-zero comfort.
- Small Electric Space Heaters: For specific zones like a bathroom or a reading nook, a small, safe electric heater can be useful. Always ensure they have tip-over protection and automatic shut-off.
- Smart Thermostats: Allow for precise temperature control and even remote management, improving both guest comfort and energy efficiency.
Expert Insight: Never compromise on safety. Every yurt operating in sub-zero conditions MUST have a functioning carbon monoxide detector and a smoke detector. Regular maintenance of heating systems by certified professionals is not optional. Your guests' lives depend on it.
Case Study: Alpine Retreat's Revenue Surge
"Alpine Retreat," a glamping site nestled in the Colorado Rockies, faced significant challenges with their yurts during winter, leading to a drastically shortened booking season. Guests complained of cold floors and inconsistent heating, despite having wood stoves. After consulting with me, they implemented a multi-pronged heating strategy. They upgraded their yurt platforms with 6 inches of XPS insulation, installed a supplemental radiant electric mat beneath their finished floors, and added smart thermostats to their existing wood stove setup (using a fan to circulate heat more effectively). They also provided insulated yurt slippers and thick duvets as part of the guest experience. The results were transformative: their winter booking rate increased by 45% in the first season, and guest satisfaction scores for 'comfort' jumped by 30 points. They were able to charge a premium for their 'luxury winter experience,' extending their profitable season by three months and achieving a full ROI on their upgrades within two years.
| Heating System | Upfront Cost | Running Cost (Sub-Zero) | Maintenance | Safety Concerns | Guest Experience |
|---|---|---|---|---|---|
| Wood Stove | Medium | Low (fuel dependent) | High (ash, chimney clean) | CO, fire risk | Authentic, cozy (requires tending) |
| Propane Direct-Vent | Medium-High | Medium-High | Medium (tank refills, checks) | CO (if not direct-vented) | Consistent, hands-off warmth |
| Electric Radiant Floor | High | High | Low | Electrical overload (rare) | Luxurious, even, silent heat |
| Electric Baseboard/Panel | Low-Medium | High | Low | Fire risk (if obstructed) | Basic, zone heating |
Ventilation and Humidity Control: Battling Condensation
Condensation is the silent killer of glamping comfort and yurt longevity in cold climates. It leads to dampness, mold, unpleasant odors, and can even compromise the structural integrity of materials over time. In a sub-zero environment, where the interior is warm and humid and the exterior is frigid, condensation is an ever-present threat.
Understanding the Condensation Challenge
Warm, moist air inside the yurt comes into contact with cold surfaces (walls, windows, dome), causing the water vapor to condense into liquid. This isn't just from breathing; cooking, showering, and even drying clothes contribute significantly to indoor humidity. Without proper management, condensation will manifest as dripping from the ceiling, damp bedding, and eventually, mildew growth.
Strategic Ventilation Solutions
The goal is to exchange humid indoor air with drier outdoor air without losing excessive heat. It's a delicate balance.
- Low-Level Vents: Install adjustable vents near the floor. Cold, fresh air is denser and will enter here.
- High-Level Vents/Exhaust Fans: Place vents or a small, quiet exhaust fan near the peak of the yurt (or in a bathroom/kitchenette). Warm, moist air rises and will be expelled here.
- Cross-Ventilation: On warmer winter days, even a few minutes of opening opposing windows or doors can rapidly exchange air and reduce humidity.
- Heat Recovery Ventilators (HRVs): For truly advanced systems, an HRV recovers heat from the outgoing stale air and transfers it to the incoming fresh air, providing excellent ventilation with minimal heat loss. This is a significant investment but highly effective for year-round sub-zero operation.
Humidity Management Tools
Beyond active ventilation, you can employ other strategies:
- Dehumidifiers: A portable dehumidifier can be highly effective, especially in bathrooms or during particularly damp periods. Ensure it has a continuous drain option.
- Moisture Absorbers: Smaller, passive moisture absorbers can be placed in closets or less-ventilated areas.
- Guest Education: Empower your guests. Provide clear instructions on how to use ventilation, suggest opening a window for a few minutes after showering, and discourage drying wet gear inside the yurt if possible.
Doors, Windows, and Entryways: Sealing the Cold Out
Doors and windows are notoriously weak points in any thermal envelope. In a yurt, they are often where drafts creep in and heat escapes, making them critical areas to address for sub-zero performance.
Upgrading Openings for Thermal Performance
Standard yurt windows and doors are often not designed for extreme cold. Upgrades are essential:
- Double-Pane Windows: If your yurt has glass or acrylic windows, upgrading to double-pane (or even triple-pane) units dramatically reduces heat transfer. Ensure they are well-sealed and weather-stripped.
- Insulated Doors: Replace thin, uninsulated doors with solid-core, insulated exterior doors. Add weatherstripping around the frame and a good door sweep at the bottom to prevent drafts.
- Window Treatments: Heavy, insulated curtains or thermal blinds can add an extra layer of protection, especially at night.
Creating an Insulated Vestibule or Mudroom
One of the most effective strategies for maintaining internal warmth is to create an airlock system at the entrance. This can be a small, insulated vestibule or mudroom attached to the main yurt door.
When guests enter, they close the exterior vestibule door before opening the yurt door, preventing a direct rush of cold air into the main living space. This also provides a practical space to shed snowy boots and wet outerwear, keeping the main yurt cleaner and drier.

Water and Waste Management in Freezing Conditions
Nothing ruins a glamping experience faster than frozen pipes or non-functional plumbing. Managing water and waste in sub-zero temperatures requires careful planning and robust infrastructure.
Protecting Plumbing from Freezing
Any exposed water lines, whether supply or drain, are susceptible to freezing. This can lead to burst pipes, costly repairs, and significant downtime.
- Heat Tracing: Install self-regulating heat trace cables along all exposed water supply and drain lines. These cables automatically adjust their heat output based on ambient temperature.
- Insulation: Wrap all pipes, especially those with heat tracing, with high-quality pipe insulation.
- Under-Yurt Protection: If your plumbing runs beneath the yurt, ensure the under-floor area is well-skirted and insulated to create a warmer microclimate.
- Drainage: For seasonal yurts, ensure all lines can be completely drained and blown out with compressed air during winterization. For year-round operation, ensure constant flow or heating.
For more detailed guidelines on cold-weather plumbing, I highly recommend consulting resources from organizations like the U.S. Environmental Protection Agency's WaterSense program, which offers excellent advice on protecting pipes in freezing weather.
Managing Greywater and Blackwater Systems
Waste management in sub-zero conditions presents its own set of challenges. Traditional septic systems can struggle, and holding tanks can freeze.
- Insulated Holding Tanks: If using holding tanks for greywater or blackwater, ensure they are heavily insulated and potentially heated with tank heaters or heat trace.
- Heated Drain Lines: Just like supply lines, drain lines need protection. Ensure they have a consistent slope and are heat-traced and insulated to prevent freezing.
- Composting Toilets: For blackwater, composting toilets are an excellent, often preferred, solution for glamping yurts, as they eliminate the need for water-based flushing and associated freezing risks.
- Greywater Filtration: If you're using greywater for irrigation (only in non-freezing months), ensure the system can be completely drained and winterized.
Proactive Maintenance and Operational Protocols
Even the best-designed yurt will fail without diligent maintenance and clear operational procedures. In a sub-zero environment, being proactive is not just smart business; it's a necessity for safety and guest satisfaction.
Pre-Season Inspection Checklist
Before the first frost hits, conduct a thorough inspection of every yurt. This checklist is a minimum:
- Exterior Fabric: Inspect for tears, abrasions, or weakened seams. Repair any damage immediately to prevent moisture ingress.
- Insulation Layers: Check that all insulation is in place, dry, and free from pests.
- Roof and Dome: Inspect for cracks, proper sealing, and ensure any dome covers or structural reinforcements are ready.
- Heating System: Have all heating units professionally serviced. Clean chimneys, check gas lines, test electrical connections.
- Carbon Monoxide & Smoke Detectors: Test all detectors and replace batteries.
- Plumbing: Verify heat tracing and insulation on all pipes. Confirm water pressure and drainage.
- Doors and Windows: Check weatherstripping, seals, and ensure latches and locks function smoothly.
- Foundation/Skirting: Inspect for rodent entry points or damage to insulation.
In-Season Monitoring and Response
During the winter months, your operations team needs clear protocols:
- Daily Checks: Conduct daily visual inspections of heating systems, CO detectors, and general yurt condition.
- Snow Removal: Have a clear plan for snow removal from yurt roofs and around entrances. Heavy snow can accumulate quickly and pose a structural risk.
- Emergency Plan: Develop and communicate an emergency plan for heating system failures, power outages, or severe weather. Ensure staff are trained and guests know what to do.
- Fuel Management: For wood stoves or propane, ensure a consistent, reliable supply of fuel.
Guest Education for Cold Weather Comfort
Your guests are part of your operational team. Provide them with clear, concise information upon arrival:
- Instructions for using the heating system safely and efficiently.
- Guidance on ventilation to prevent condensation.
- Recommendations for appropriate clothing and footwear.
- Information about extra blankets, hot water bottles, or other comfort items available.
For additional best practices and industry insights, consider joining and regularly checking resources from reputable organizations like the Glamping Business Association or similar regional tourism bodies.
Financial Considerations and ROI of Winterization
Investing in comprehensive winterization might seem like a significant upfront cost, but I can tell you from experience, the return on investment (ROI) for
Calculating the Investment
Your investment will include materials (insulation, heating upgrades, plumbing protection), labor for installation, and potentially professional consultations. It's crucial to get detailed quotes and compare options. However, view this not as an expense, but as an asset improvement.
Maximizing Off-Season Revenue
The primary financial benefit is the extension of your operational season. Instead of closing for 3-5 months, you can potentially operate year-round. Winter glamping offers a unique, high-demand experience that often commands premium pricing. Guests are willing to pay more for comfort and novelty in a challenging environment.
Reduced guest complaints, fewer emergency repairs from freezing, and enhanced brand reputation for reliability all contribute to long-term profitability. Furthermore, an energy-efficient yurt will have lower running costs over time, offsetting some of the initial investment.
For a deeper dive into calculating ROI for business improvements, resources like the Harvard Business Review often publish excellent articles on strategic financial planning and investment analysis.
| Investment Category | Estimated Cost | Annual Savings/Revenue Increase | Payback Period |
|---|---|---|---|
| Insulation Upgrades | $1,500 - $3,000 | $500 - $1,000 (reduced heating, extended season) | 1.5 - 6 years |
| Heating System Upgrades | $1,000 - $4,000 | $300 - $1,500 (efficiency, guest comfort) | 1 - 13 years |
| Plumbing Protection | $500 - $1,500 | $200 - $800 (avoided repairs, operational uptime) | 0.5 - 7.5 years |
| Total Estimated Investment | $3,000 - $8,500 | $1,000 - $3,300 | ~1 - 8.5 years |
Frequently Asked Questions (FAQ)
How much does it typically cost to fully winterize a standard glamping yurt? The cost can vary significantly based on the yurt's existing features, size, and the severity of the winterization required. For a basic 20-foot yurt, expect to invest anywhere from $3,000 to $8,500 for comprehensive insulation, heating, and plumbing upgrades. This doesn't include the initial cost of the yurt itself but focuses on making it truly sub-zero ready. High-end, custom solutions can certainly exceed this range.
What are the most common mistakes operators make when winterizing yurts? The biggest mistakes I see are underestimating ground heat loss, neglecting proper ventilation leading to severe condensation, and cutting corners on structural reinforcement for snow loads. Another common error is failing to educate guests on how to effectively use the yurt's winter features, which can lead to discomfort even in a well-prepared unit.
Can existing yurts be effectively retrofitted for sub-zero operation, or is it better to buy new? Most existing yurts can be effectively retrofitted, especially those from reputable manufacturers. The key is a thorough assessment of the current structure, insulation, and utility access. Retrofitting typically involves adding layers of insulation, upgrading heating, reinforcing structures, and protecting plumbing. While buying a purpose-built cold-weather yurt is ideal, a strategic retrofit can be highly successful and more cost-effective.
What's the best way to prevent condensation on the interior fabric in extreme cold? The best approach is a multi-faceted one: 1) Ensure excellent insulation to keep interior surfaces warm; 2) Implement strategic ventilation (low-level intakes, high-level exhausts, potentially HRVs) to exchange humid air; 3) Use a dehumidifier in high-humidity areas; and 4) Educate guests on practices like brief cross-ventilation and managing moisture from cooking/showering.
How do I handle emergency situations like a heating system failure in sub-zero temperatures? Develop a comprehensive emergency plan. This should include having backup heating options (e.g., small electric heaters, emergency propane heaters), easily accessible contact information for repair technicians, and a protocol for relocating guests to a heated alternative (e.g., a common lodge, nearby hotel) if the yurt becomes uninhabitable. Ensure staff are trained to execute this plan quickly and safely.
Key Takeaways and Final Thoughts
Successfully operating glamping yurts year-round in sub-zero conditions is not a pipe dream; it's a tangible goal achievable through meticulous planning, strategic investment, and diligent execution. My years in this niche have shown me that those who embrace the challenge with a comprehensive approach not only survive but thrive, creating truly unforgettable experiences for their guests and securing a robust, extended revenue stream for their business.
- Prioritize the Foundation: Insulate your yurt's base and floor system aggressively.
- Fortify the Envelope: Implement multi-layered wall and roof insulation, and reinforce for snow loads.
- Optimize Heating: Choose efficient, safe heating systems and consider supplemental/zoned options.
- Master Condensation Control: Balance ventilation with heat retention and use humidity management tools.
- Seal Every Opening: Upgrade doors and windows, and consider an insulated vestibule.
- Protect Utilities: Implement heat tracing and insulation for all water and waste lines.
- Embrace Proactive Operations: Regular maintenance, clear protocols, and guest education are non-negotiable.
By diligently applying the strategies outlined in this guide, you're not just preparing your yurts for winter; you're transforming them into resilient, luxurious havens that stand strong against the harshest elements. This commitment to quality and comfort will differentiate your glamping business, attract discerning guests, and ensure your investment delivers returns long after the snow has melted. Go forth, build wisely, and let your yurts shine, even in the depths of winter!
Recommended Reading
- 7 Protocols: Avoiding Avalanche Risk in Remote Heli-Ski Backcountry?
- Beyond ADA: 9 Steps to Guarantee Accessible Hotel Rooms for Complex Needs?
- 5 Smart Strategies: Navigate City Public Transport Without Wasting Time
- Streamline Your Solo Trip: Busy Pros Plan Safe Backpacking in 5 Steps
- 5 Critical Steps: Solo Business Trip Safety Emergency Plan

Your email address will not be published. Required fields are marked *